
von Ralf Schweiger | Jan. 23, 2025 | Allgemein, Computers, Debian, Linux, Proxmox, Virtualsierung, Windows 11
Das Ende von Windows 10 ist der Beginn von Windows 11.

Nach dem 14. Oktober 2025 wird Microsoft keine Updates mehr für Windows 8.1 und Windows 10 mehr zur Verfügung stellen.
Quelle: Microsoft kündigt Windows 8.1 und Windows 10 EOL an.
Da es neben inkompatibler Hardware, auf dem Windows 10 läuft und das man virtualisieren möchte, auch bestehende virtuelle Windows 10 Maschinen auf Proxmox VE gibt, die auf Windows 11 upgedated werden sollen oder müssen, ist hier das Step-by-Step-Upgrade-How-To.
Die Systemvoraussetzungen für Windows 11 sind folgende:
- 4 GB RAM
- 64GB Disk
- TPM 2.0
- UEFI
- Kompatible CPU
- u.a.
Die vollständige Liste ist hier zu finden: Microsoft Windows 11 Systemanforderungen.
Teil 1: Proxmox VE Upgrade

Wir brauchen also zuerst einmal Proxmox VE in der Version 8, da hier erstmals TPM 2.0 verfügbar ist und auch UEFI vollständig Windows 11 -fähig unterstützt wird.
Hier ist die Upgrade-Prozedur beschrieben: Proxmox VE 7 to 8
Zusammengefasst durchlaufen wir folgende Schritte:
Shutdown sämtlicher VMs und Container.
Proxmox 7 noninteraktiv auf den neuesten Stand bringen und Version ausgeben:
export DEBIAN_FRONTEND=noninteractive; apt update
yes '' | apt-get -y -o DPkg::options::="--force-confdef" -o DPkg::options::="--force-confold" upgrade
yes '' | apt-get -y -o DPkg::options::="--force-confdef" -o DPkg::options::="--force-confold" dist-upgrade
apt autoremove
pveversion
Proxmox 7to8 Check:
pve7to8
Dieser Schritt darf keine Fehler ausgeben. Falls doch, sind diese erst einmal zu beheben. Uns ist noch keiner unter gekommen.
Falls bei euch einer auftritt, bitte hier einen Kommentar hinterlassen.
Proxmox 8 Repo Upgrade:
sed -i 's/bullseye/bookworm/g' /etc/apt/sources.list /etc/apt/sources.list.d/pve-enterprise.list
Refresh Repo Index:
apt update
Upgrade auf Proxmox 8:
apt dist-upgrade
Das war es erst mal für Proxmox. Nach reboot steht die Proxmox VE in der Version 8 zur Verfügung.
Wie man physikalische Windows 10 Hardware virtualisiert, um es auf Windows 11 upzugraden, erspare ich uns erst mal.
Gegebenenfalls wird es dafür noch einen weiteren Beitrag geben, falls das von Interesse ist und ihr das in den Kommentaren wünscht.
Teil 2: Windows 10 vorbereiten: Disk nach GPT konvertieren
Ein essentieller Schitt für die Umstellung zu UEFI ist die Umwandlung der Windows vDisk von MBR auf GPT.
Am einfachsten geschieht das unter Windows selbst.
1. Dazu ist ein Command-Fenster (cmd) als Administrator zu starten.
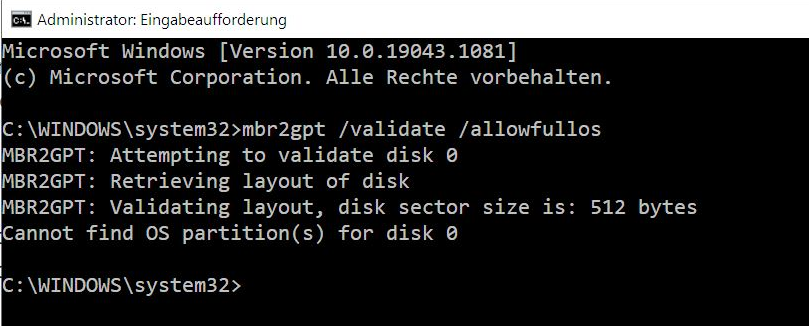
2. Im Command-Fenster ist folgender Validierungsbefehl auszuführen:
mbr2gpt /validate /allowFullOS
Falls dieser Befehl fehlerfrei beendet wurde, kann die Konvertierung der Disk nach GPT finalisiert werden durch folgenden Befehl:
mbr2gpt /convert /disk:0 /allowFullOS
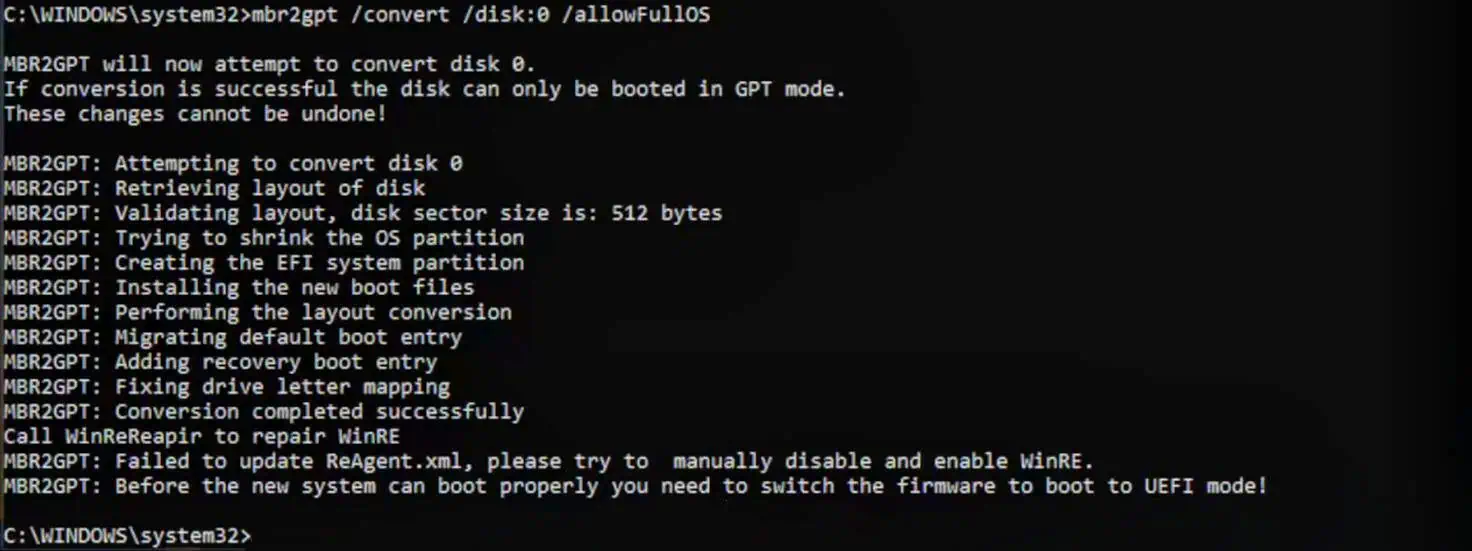
Die VM kann nun herunter gefahren werden. Falls der Hypermode aktiv ist, einfach statt Herunterfahren, einen Neustart durchführen und die VM in dem Moment stoppen, wenn das Proxmox-Boot-Logo angezeigt wird.
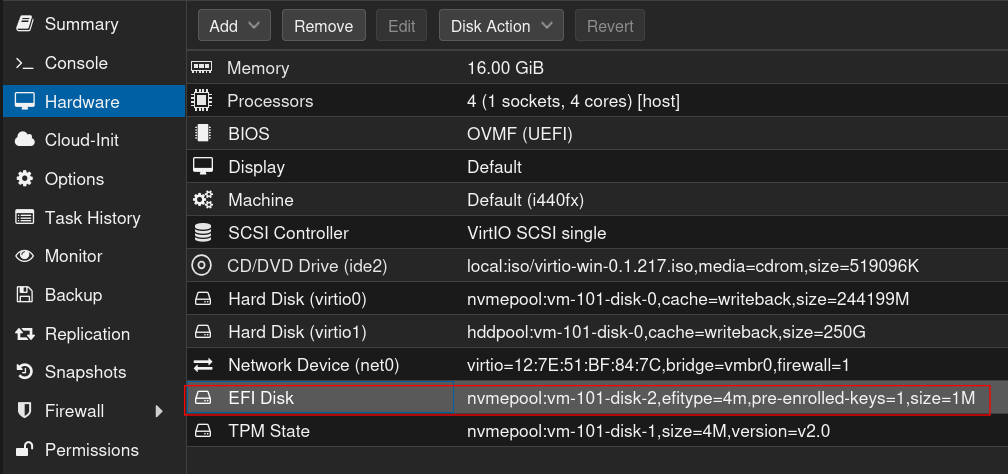
Teil 3: Anpassungen der VM Hardware unter Proxmox VE
1. Umstellung der CPU auf [host]
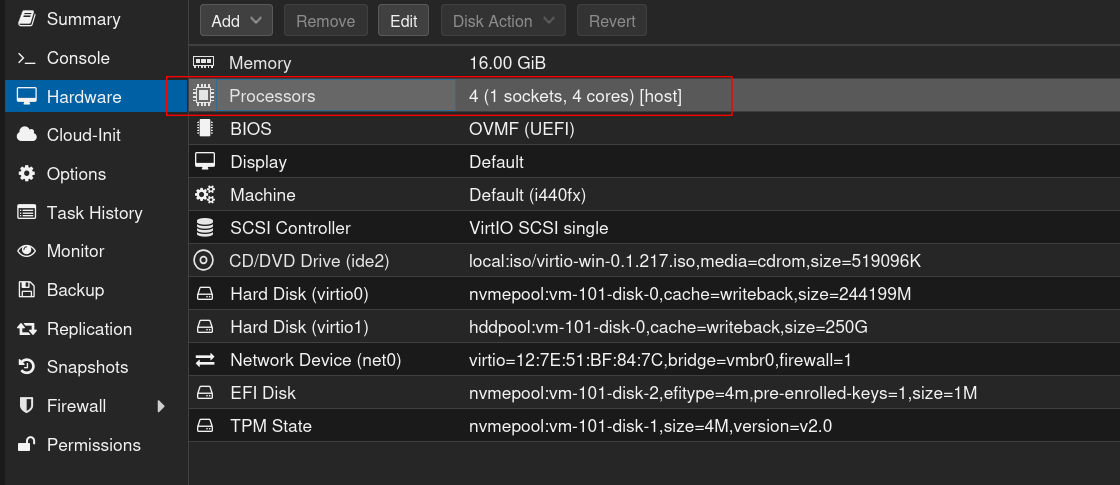
2. Einfügen einer EFI Partition
3. Umstellen des BIOS auf UEFI
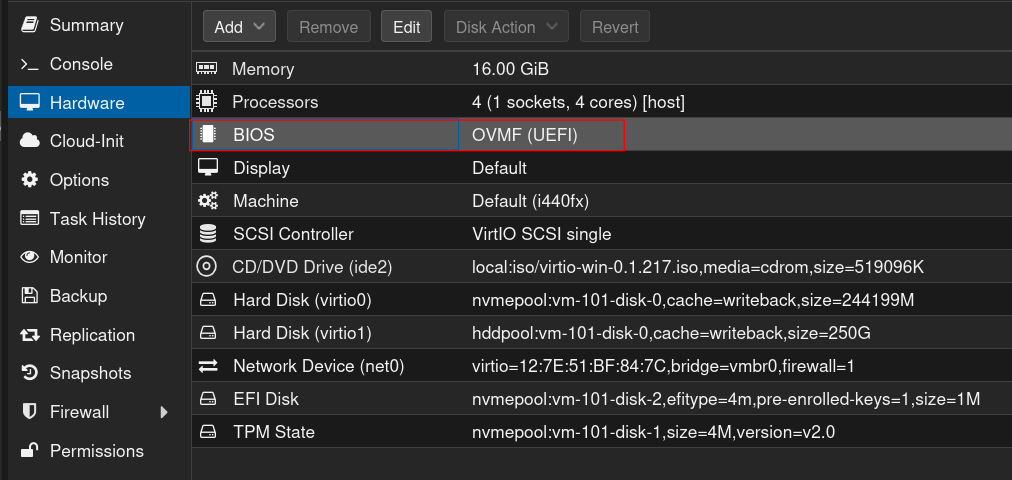
4. Einfügen des TPM 2.0 Chips
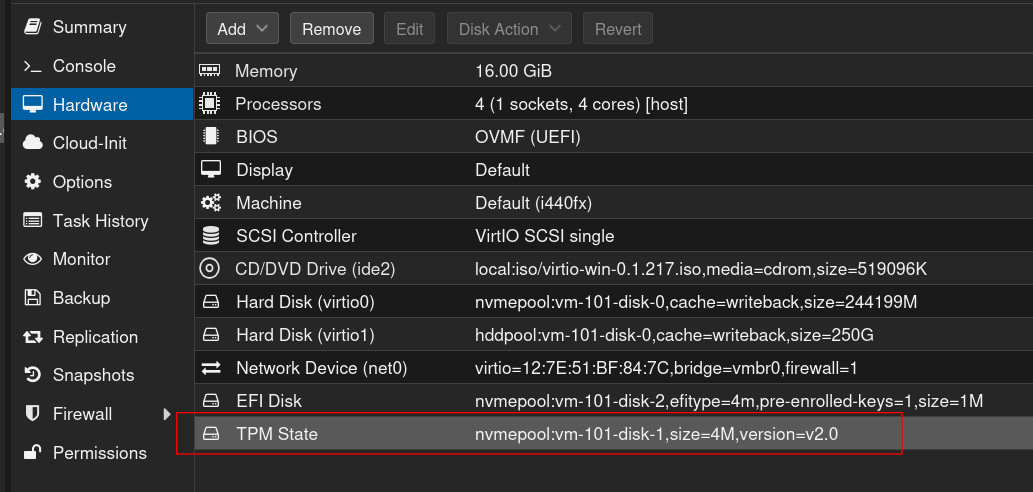
5. Booten der Windows 10 VM
Teil 4: Upgrade auf Windows 11

1. PC Health Check
Download PC Health Check unter https://aka.ms/GetPCHealthCheckApp, installieren und ausführen.
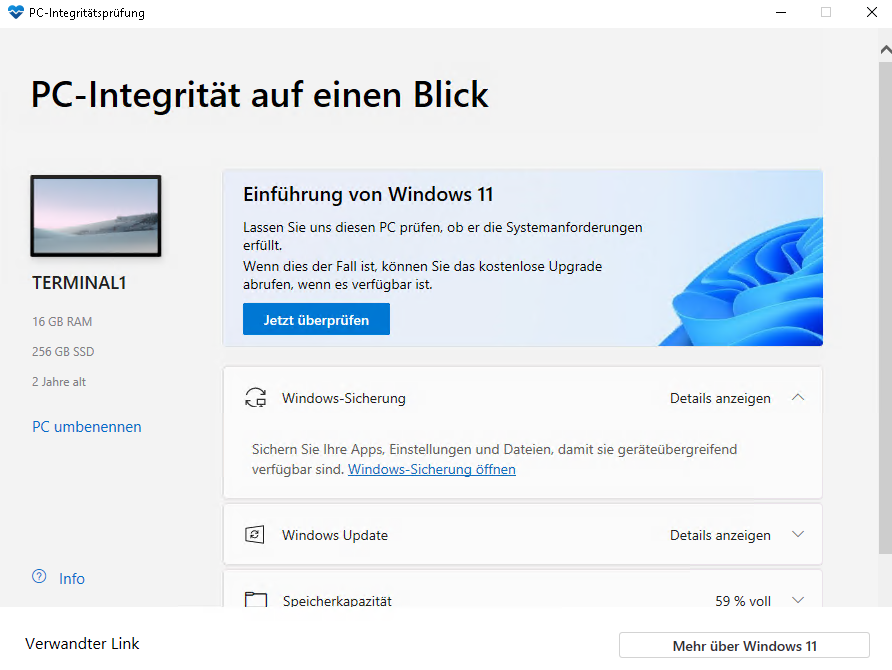
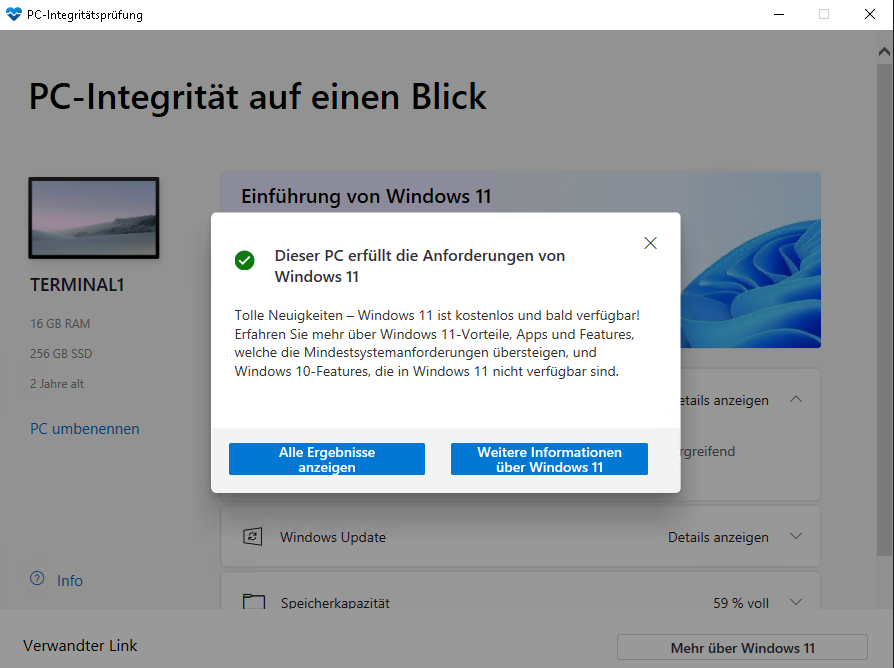

Wenn alles grün ist, kann das eigentliche Update beginnen.
2. Update auf Windows 11
Falls Windows Update nicht anbietet, auf Windows 11 upzudaten, kann man das auch manuell anstoßen.
Download von Windows 11 Updater hier: https://www.microsoft.com/software-download/windows11
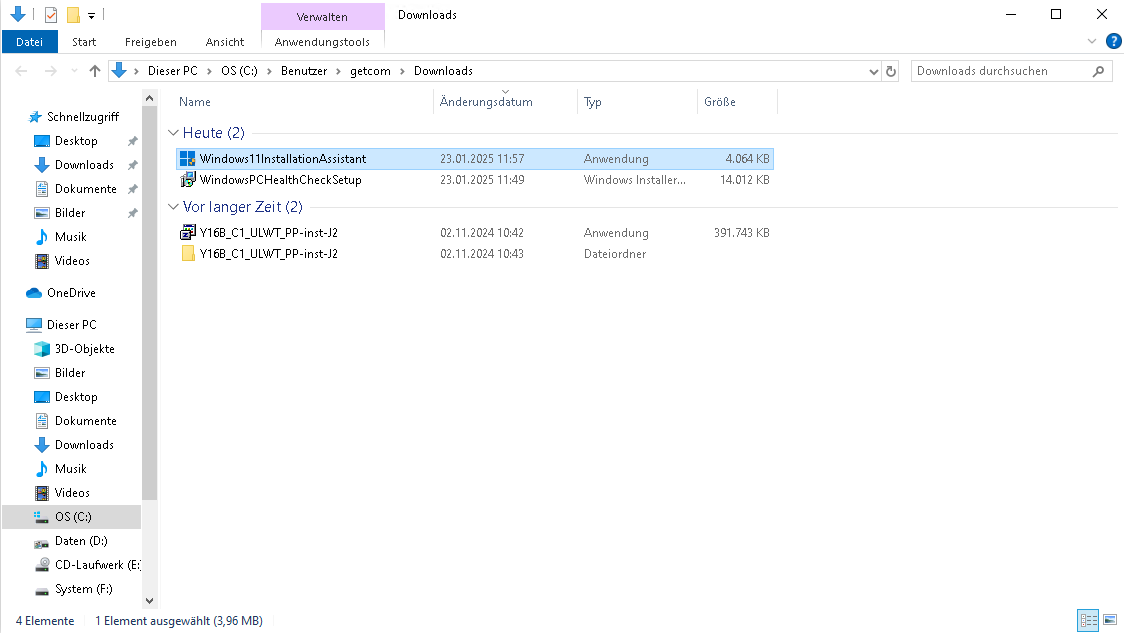
Ausführen der Setup-Datei Windows11InstallationAssistant:
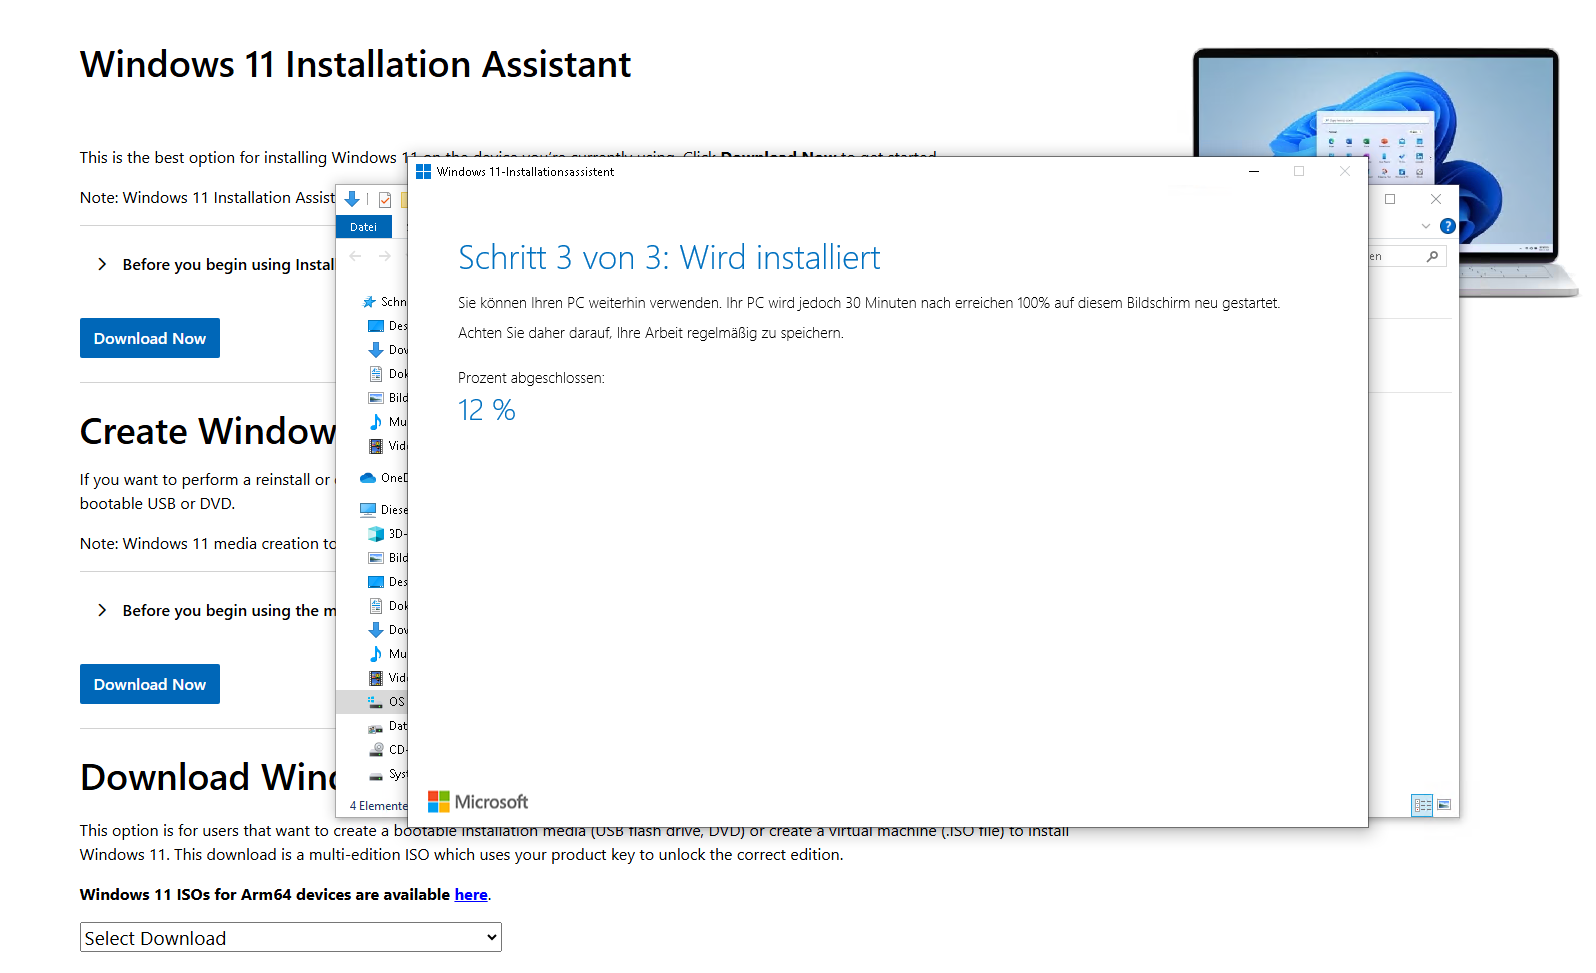

Nach dem Neustart steht Windows 11 zur Verfügung.
Voilà

von Ralf Schweiger | Jan. 21, 2025 | Allgemein, Linux, Proxmox, Virtualsierung
Nachfolgende Fehlermeldung führt dazu, dass die Backups für die Sync-Gruppe ct/110 auf einen Fehler laufen:
2025-01-20T18:37:35+01:00: sync group ct/110 failed - owner check failed (backupuser@pbs != root@pam)
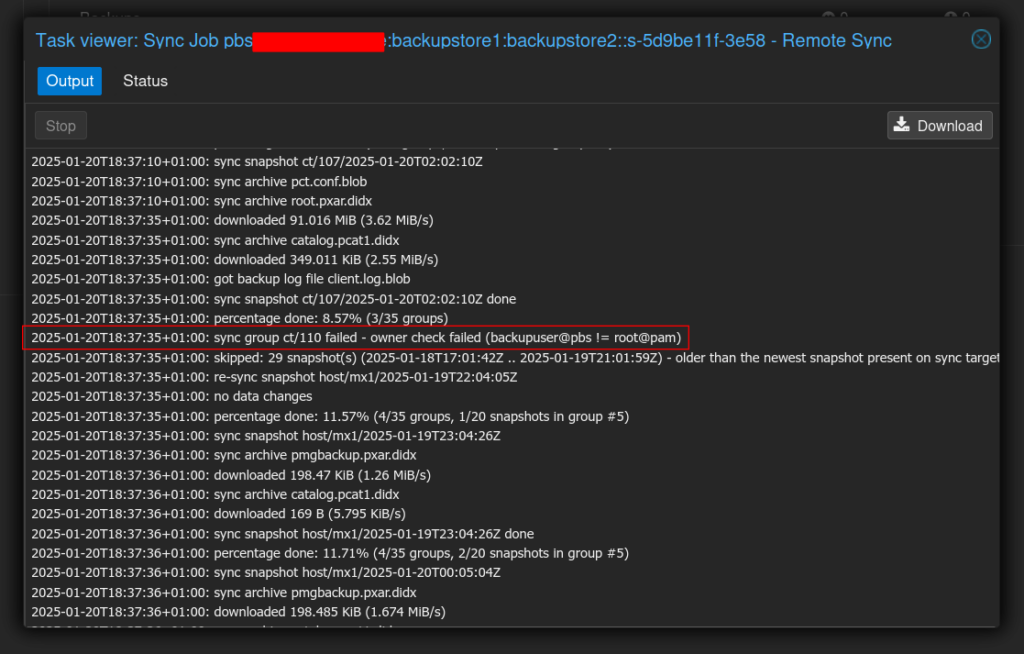
Aus irgendeinem Grund stimmen die lokalen Berechtigungen nicht für die Sync-Gruppe.
Hier scheint sich das um einen Bug zu handeln, der bei Verbindungsabbrüchen von online Backups und VPN-Tunnel zum Tragen kommt.
Bei Proxmox haben einige User dieses Problem. Da gab es auch einen Bug dazu, der aber noch nicht nachgestellt werden konnte.
Ein Workaround, der bei uns funktionierte, ist einfach die ownership der Sync-Gruppe auf dem Sync-Server zu überschreiben:
Annahme: Das Backup-Repo soll backupstorage2 heißen, der lokale Benutzer mit entsprechenden Berechtigungen auf das Repo soll backupuser@pbs heißen, dann wäre der Befel folgender:
proxmox-backup-client change-owner ct/110 backupuser@pbs --repository backupstore2
Möchte man alle vorhandenen Sync-Gruppen in einem Rutsch bereinigen, kann das in das Script „/usr/local/bin/pbs-correct-sync-group-ownership.sh“ packen:
#!/bin/bash
storagepath="$(dirname $(grep path /etc/proxmox-backup/datastore.cfg | awk '{print $2}'))"
repository="$(grep datastore: /etc/proxmox-backup/datastore.cfg | awk '{print $2}')"
backupuser="$(grep -r owner /etc/proxmox-backup/sync.cfg | awk '{print $2}')"
type="ct host vm"

for t in $type
 {
 for s in $(ls $storagepath/$repository/$t)
  {
   printf "Changing ownership of sync group $t/$s...\n"
   proxmox-backup-client change-owner $t/$s $backupuser --repository $repository
  }
 }
von Ralf Schweiger | März 14, 2020 | Free BSD, Free NAS, Infiniband, Proxmox, Supermicro, Virtualsierung


Performance auf shared iSCSI Storage ist Pflicht, wenn man viele VMs auf einem Proxmox-Cluster betreiben möchte.
Wie sich dabei die einzelnen Protokolle und Implementierungen verhalten, ist hier in der Übersicht zu sehen:

Zeta Systems hat genauestens untersucht, welche Performance aktuell von welchem Protokoll zu erwarten ist:
http://www.zeta.systems/blog/2016/09/21/iSCSI-vs-iSER-vs-SRP-on-Ethernet-&-InfiniBand/
Es soll somit iSER sein. Beschäftigt man sich damit, stellt man fest, dass die Technologie bereits sehr lange existiert, aber scheinbar bisher ein wenig unter gegangen ist.
Eine Präsentation von 2008:
https://www.snia.org/sites/default/orig/sdc_archives/2008_presentations/wednesday/PeterDunlap_OpenSolaris_iSER.pdf
Die Infiniband-Basics auf dem FreeBSD-Wiki:
https://wiki.freebsd.org/InfiniBand
Und hier ein Beitrag von 2016 auf der FreeBSD SCSI Liste:
https://freebsd-scsi.freebsd.narkive.com/sQG1P9kO/help-to-make-iser-working
Hier trägt Ben Rubson das wesentliche zusammen:
Ben RUBSON
4 years ago

Hi,

I went with a fresh new install to have a clean status.

What I did :

// FreeBSD 11-RC1 installation
# echo "WITH_OFED=YES" > /etc/make.conf
# cd /usr/src/ ; make buildkernel KERNCONF=GENERIC ; make installkernel KERNCONF=GENERIC
# cd /usr/src/sys/modules/mlx4 ; make ; make install
# cd /usr/src/sys/modules/mlxen ; make ; make install
# cd /usr/src/sys/modules/iser ; make ; make install
# echo "mlx4_load=YES" >> /boot/loader.conf
# echo "mlxen_load=YES" >> /boot/loader.conf
# echo "iser_load=YES" >> /boot/loader.conf
# reboot

Everything went fine, no code modition needed or whatever, perfect.

# iscsictl -A -t iqn.2012-06.com.test:target1 -p 192.168.2.2
On the target, I get :
tgtd[1912]: tgtd: login_start(502) Target iqn.2012-06.com.test:target1 is RDMA, but conn cid:0 from iqn.1994-09.org.freebsd:srv1 is TCP
Perfect, the target is correctly iSER enabled.

# iscsictl -A -t iqn.2012-06.com.test:target1 -p 192.168.2.2 -r
I still get the following error :
iscsid[1062]: 192.168.2.2 (iqn.2012-06.com.test:target1): failed to connect to 192.168.2.2 using ICL kernel proxy: ISCSIDCONNECT: Input/output error
kernel: INFO: iser_free_ib_conn_res: freeing conn 0xfffff80147771000 cma_id 0 qp 0
kernel: DEBUG: iser_conn_connect: before cv_wait: 0xfffff80147771000
kernel: INFO: iser_cma_handler: event 1 status -19 conn 0xfffff80147771000 id 0xfffff8005f0e5400
kernel: ERROR: iser_connect_error: conn 0xfffff80147771000
kernel: DEBUG: iser_conn_connect: after cv_wait: 0xfffff80147771000
iscsid[853]: child process 1062 terminated with exit status 1

Waiting for your instructions, would really be nice to have it working for 11 release.

Many thanks !

Best regards,

Ben
...
Ben RUBSON
4 years ago
Permalink
...
This was missing :
cd /usr/src/sys/modules/mlx4ib/ ; make ; make install ; kldload mlx4ib.ko

Now it works perfectly...
I'm really sorry for the useless noise on this list...

I hope this above howto will help others.

Thank you again for your support, and sorry again :-/

Benchmarks will of course follow.

Best regards,

Ben
iSer läuft mittlerweile auf FreeBSD, aber eben nicht unter FreeNAS.
Ein Kommentar auf iXsystems Jira lässt hoffen, klar ist das aber nicht:
Kris Moore added a comment - 11/Jan/20 2:53 PM

We're considering some changes this year which may include down
the road iSER support. Closing for now, but stay tuned later
in 2020.
Es sieht also danach aus, dass man sich damit gerade beschäftigt. Ob das Feature aber TrueNAS Core oder TrueNAS Enterprise sein wird, wissen wir nicht.
Daher ist der Weg für uns erst einmal, dass wir das selbst implementieren. Wir brauchen das JETZT, nicht erst im Sommer 2020.
Wie die Story weiter geht, erfahrt Ihr nun.
FreeNAS hat sich bei unseren Tests als nicht gangbar erwiesen.
Problem ist einerseits die ungenügende Mellanox-Unterstützung und andererseits die allgemeine Bestrebung von OSS-Unternehmen, Teile des Codes closed source zu machen und dies als Enterprise-Version zu vermarkten.
Support alleine macht nicht glücklich. Man versucht, dauerhafte Einnahmen zu etablieren, um planbarer zu sein.
Aber zurück zum Thema iSER.
Da Linux eine hervorragende iSER Unterstützung mitbringt und eine der führenden Distributionen sowieso schon im Haus ist, lag es am nahe, zu unseren Proxmox VE Cluster-Knoten auch den restlichen Bereich damit abzudecken: Proxmox iSER/iSCSI-Server, Proxmox Mail Gateway, Proxmox Backupserver.
Proxmox setzen wir auf mit einem ZFS-Pool raidz-1 auf zwei gespiegelten Intel NVMe SSD DC P4511 mit je 900GB. Das hätte es zwar nicht gebraucht, aber die lagen noch im Regal.
Erster Schritt, evtl. noch vorhandene ZFS-Metadaten löschen, und zwar am Ende und am Anfang der Platten.
dd bs=512 if=/dev/zero of=/dev/nvme0n1 count=2048 seek=$(($(blockdev --getsz /dev/nvme0n1) - 2048))
dd bs=512 if=/dev/zero of=/dev/nvme0n1 count=2048
dd bs=512 if=/dev/zero of=/dev/nvme1n1 count=2048 seek=$(($(blockdev --getsz /dev/nvme1n1) - 2048))
dd bs=512 if=/dev/zero of=/dev/nvme1n1 count=2048
Nach Erstinstallation bootet das System aber nicht.
Ok., Proxmox VE im Debug Modus starten, dabei stoppt das System an mehreren Stellen, was man mit exit weiter laufen lässt. Am Ende hat man eine root Shell mit allen notwendigen Werkzeugen.
Ein „zpool import“ offenbart, dass der Pool online ist.
Weiterhin lässt er sich problemlos importieren und mounten.
mkdir /mnt/rpool
zpool import -R /mnt/rpool rpool
zpool export
Das Problem war hier der BIOS legacy mode.
Nach einem „zpool destroy -f rpool“, Umstellung auf UEFI und Neuinstallation mit UEFI-Boot von Proxmox VE 6.4, war das Boot-Problem behoben.
Basisinstallation iSCSI/Infiniband Tools, opensm Infiniband Subnet Manager, NFS-Server und targetcli-fb zum managen von iSER Devices:
apt-get install apt-file net-tools opensm nfs-kernel-server rtr-tools scsitools scsitools targetcli-fb librdmacm1 ibacm infiniband-diags srptools vim  ibutils ibverbs-providers ibverbs-utils rdmacm-utils perftest tgt open-iscsi lsscsi tgt multipath-tools -y
apt-file update
Anlegen der /etc/rc.local mit folgendem Inhalt:
#!/bin/sh -e
#
# rc.local
#
# This script is executed at the end of each multiuser runlevel.
# Make sure that the script will "exit 0" on success or any other
# value on error.
#
# In order to enable or disable this script just change the execution
# bits.
#
# By default this script does nothing.
# run at startup
echo 0 > /proc/sys/kernel/hung_task_timeout_secs
/usr/local/bin/iser-performance-tuning.sh
exit 0
Anlegen des iser-performance-tuning.sh Skripts /usr/local/bin/iser-performance-tuning.sh:
#!/bin/bash
target=pvecn0
verbose=0
messenger(){
if [ "$verbose" = "1" ]
then printf "$MSG\n"
fi
}
# iSER LIO server is target, clients are initiators
if [ "$(hostname)" = "$target" ]
then iSERtype="target"
else iSERtype="initiator"
fi
MSG="iSER type is:\t$iSERtype"
messenger
irq_affinity(){
#relevant for target and initiator
MSG="IRQ affinity setup..."
messenger
#service irqbalancer stop 2>&1>/dev/null
IRQS=$(cat /proc/interrupts | egrep 'mlx4|mlx5' | awk '{print $1}' | sed 's/://')
cores=($(seq 1 $(grep -c processor /proc/cpuinfo)))
i=0
#echo ${#cores[@]}
for IRQ in $IRQS
do
core=${cores[$i]}
let "mask=2**(core-1)"
#printf "IRQ\t:\t$IRQ\nIndex\t:\t$i\ncore\t:\t$core\nmask\t:\t$mask\n"
echo $(printf "%x" $mask) > /proc/irq/$IRQ/smp_affinity
i=$(($i+1))
if [ "$i" = "${#cores[@]}" ]; then i=0
fi
done
}
cpu_performance_scaling(){
# relevant for target and initiator
MSG="CPU performance setup..."
messenger
for i in $(ls /sys/devices/system/cpu/cpu[0-9]*/cpufreq/scaling_governor | sed -e "s/ /\n/g")
{
echo performance >$i
}
}
block_layer_staging(){
# relevant for initiators only
MSG="Block layer staging..."
messenger
# set IO scheduler to do no-operation.
# IO schedulers try to accelerate HDD access time by minimizing seeks.
# When working with SAN targets normally it is better to let the target machine do these optimizations if needed (normally a single LUN is not made of a single HDD...).
#In addition, SDDs do not suffer from seek time.
for i in $(ls /sys/block/[a-z]*/queue/scheduler)
{
echo "noop" >$i 2>&1>/dev/null
}
# Normally the block layer will try to merge IOs to consecutive offsets.
# On fast SAN networks it may be better not to merge, and save the CPU utilization.
for i in $(ls /sys/block/[a-z]*/queue/nomerges)
{
echo 2 >$i
}
# The system uses physical devices to gather randomness for its random numbers generator.
# Can save some utilization by turning this off.
for i in $(ls /sys/block/[a-z]*/queue/add_random)
{
echo 0 >$i
}
# Deliver IO completion on the same core that handled the request.
for i in $(ls /sys/block/[a-z]*/queue/rq_affinity)
{
echo 1 >$i
}
}
set_nv_huge_pages(){
# relevant for targets only
MSG="Huge paging setup..."
messenger
# In case of kernel space target suech as LIO or SCST, set a low (or zero) number of HugePages (Increases page-cache)
echo 0 > /proc/sys/vm/nr_hugepages
}
if [ "$iSERtype" = "target" ]
then
MSG="Running target optimizations..."
messenger
irq_affinity
cpu_performance_scaling
set_nv_huge_pages
fi
if [ "$iSERtype" = "initiator" ]
then
MSG="Running initiator optimizations..."
messenger
irq_affinity
cpu_performance_scaling
block_layer_staging
fi
Anlegen von /usr/local/bin/iscsi-autologin.sh:
#!/bin/bash
### enable autologin to iSCSI target ###
iscsiadm --mode node -T iqn.2020-03.de.pawott.pvecn0.hddpool -o update -n node.startup -v automatic
iscsiadm --mode node -T iqn.2020-03.de.pawott.pvecn0.ssdpool -o update -n node.startup -v automatic
cd /etc/iscsi
grep -R node.startup * | grep -v manual
SSH-Keys id_rsa und id_rsa.pub erzeugen und verteilen auf alle Knoten nach
/root/.ssh/
/etc/pve/priv/authorized_keys
Einstellungen für remote shell
/root/.bashrc
# ~/.bashrc: executed by bash(1) for non-login shells.
# If not running interactively, don't do anything
case $- in
*i*) ;;
*) return;;
esac
# Note: PS1 and umask are already set in /etc/profile. You should not
# need this unless you want different defaults for root.
# PS1='${debian_chroot:+($debian_chroot)}\h:\w\$ '
# umask 022
# You may uncomment the following lines if you want `ls' to be colorized:
# export LS_OPTIONS='--color=auto'
# eval "`dircolors`"
alias ls='ls $LS_OPTIONS'
alias ll='ls $LS_OPTIONS -l'
alias l='ls $LS_OPTIONS -lA'
#
# Some more alias to avoid making mistakes:
# alias rm='rm -i'
# alias cp='cp -i'
# alias mv='mv -i'
if [ -f ~/.bash_aliases ]; then
. ~/.bash_aliases
fi
if [ -f /etc/bash.bashrc.local ]; then
. /etc/bash.bashrc.local
fi
Farbcodes in Ausgaben:
/etc/rc.status
# Definition of boot script return messages
#
#   The bootscripts should use the variables rc_done and rc_failed to
#   report whether they failed or succeeded.  See /etc/init.d/skeleton for
#   an example how the shell functions rc_status and rc_reset are used.
#
#   These functions make use of the variables rc_done and rc_failed;
#   rc_done_up and rc_failed_up are the same as rc_done and rc_failed
#   but contain a terminal code to move up one line before the output
#   of the actual string. (This is particularly useful when the script
#    starts a daemon which produces user output with a newline character)
#
#   The variable rc_reset is used by the master resource control script
#   /etc/init.d/rc to turn off all attributes and switch to the standard
#   character set.
#
#    \033          ascii ESCape
#    \033[G   move to column  (linux console, xterm, not vt100)
#    \033[C   move  columns forward but only upto last column
#    \033[D   move  columns backward but only upto first column
#    \033[A   move  rows up
#    \033[B   move  rows down
#    \033[1m       switch on bold
#    \033[31m      switch on red
#    \033[32m      switch on green
#    \033[33m      switch on yellow
#    \033[m        switch off color/bold
#    \017          exit alternate mode (xterm, vt100, linux console)
#    \033[10m      exit alternate mode (linux console)
#    \015          carriage return (without newline)
if test -z "$LINES" -o -z "$COLUMNS" ; then
eval `exec 3<&1; stty size <&3 2>/dev/null | (read L C; \
echo LINES=${L:-24} COLUMNS=${C:-80})`
fi
test $LINES -eq 0 && LINES=24
test $COLUMNS -eq 0 && COLUMNS=80
export LINES COLUMNS
# Make sure we have /sbin and /usr/sbin in PATH
case $PATH in
*sbin*)
;;
*)
export PATH=/sbin:/usr/sbin:$PATH
;;
esac
if test -t 1 -a "$TERM" != "raw" -a "$TERM" != "dumb" && stty size <&1 > /dev/null 2>&1 ; then
esc=`echo -en "\033"`
extd="${esc}[1m"
warn="${esc}[1;31m"
done="${esc}[1;32m"
attn="${esc}[1;33m"
norm=`echo -en "${esc}[m\017"`
stat=`echo -en "\015${esc}[${COLUMNS}C${esc}[10D"`
rc_done="${stat}${done}done${norm}"
rc_running="${stat}${done}running${norm}"
rc_failed="${stat}${warn}failed${norm}"
rc_missed="${stat}${warn}missing${norm}"
rc_skipped="${stat}${attn}skipped${norm}"
rc_dead="${stat}${warn}dead${norm}"
rc_unused="${stat}${extd}unused${norm}"
rc_unknown="${stat}${attn}unknown${norm}"
rc_done_up="${esc}[1A${rc_done}"
rc_failed_up="${esc}[1A${rc_failed}"
rc_reset="${norm}${esc}[?25h"
rc_save="${esc}7${esc}[?25l"
rc_restore="${esc}8${esc}[?25h"
function rc_cuu () { test $1 -eq 0 && return; echo -en "\033[${1}A"; }
function rc_cud () { test $1 -eq 0 && return; echo -en "\033[${1}B"; }
function rc_timer_on () {
# Draw seconds of running timout to column.
# Two arguments: timeout in seconds and offset
local n=$1
local c=$2
(trap "exit 0" TERM
while test $((n--)) -gt 0; do
sleep 1;
if test $n -gt 9 ; then
echo -en "${attn}\015${esc}[${c}C(${n}s)${norm} "
else
echo -en "${attn}\015${esc}[${c}C( ${n}s)${norm} "
fi
done) & _rc_timer_pid=$!
}
function rc_timer_off () {
if test -n "$_rc_timer_pid" ; then
kill -TERM $_rc_timer_pid > /dev/null 2>&1
fi
unset _rc_timer_pid
}
else
esc=""
extd=""
warn=""
done=""
attn=""
norm=""
stat=""
rc_done="..done"
rc_running="..running"
rc_failed="..failed"
rc_missed="..missing"
rc_skipped="..skipped"
rc_dead="..dead"
rc_unused="..unused"
rc_unknown="..unknown"
rc_done_up="${rc_done}"
rc_failed_up="${rc_failed}"
rc_reset=""
rc_save=""
rc_restore=""
function rc_cuu () { return; }
function rc_cud () { return; }
function rc_timer_on () { return; }
function rc_timer_off () { return; }
fi
_rc_service=${0##*/[SK][0-9][0-9]}
_rc_status=0
_rc_status_all=0
_rc_todo=$1
function rc_check ()
{
_rc_status_ret=$?
test $_rc_status_ret -eq 0 || _rc_status=$_rc_status_ret
test $_rc_status -eq 0 || _rc_status_all=$_rc_status
return $_rc_check_ret
}
function rc_reset ()
{
_rc_status=0
_rc_status_all=0
rc_check
return 0
}
if test "$_rc_todo" = "status" ; then
function rc_status ()
{
rc_check
_rc_status_ret=$_rc_status
local i
for i ; do
case "$i" in
-v|-v[1-9]|-v[1-9][0-9])
local vrt=""
local out=1
local opt="en"
test -n "${i#-v}" && vrt="$vrt${esc}[${i#-v}A" || opt="e"
case "$_rc_status" in
0) vrt="$vrt$rc_running"; ;; # service running
1) vrt="$vrt$rc_dead" ; out=2 ;; # service dead (but has pid file)
2) vrt="$vrt$rc_dead" ; out=2 ;; # service dead (but has lock file)
3) vrt="$vrt$rc_unused" ; ;; # service not running
4) vrt="$vrt$rc_unknown"; ;; # status is unknown
esac
echo -$opt "$rc_save$vrt$rc_restore" 1>&$out
# reset _rc_status to 0 after verbose case
_rc_status=0 ;;
-r) rc_reset ;;
-s) echo -e "$rc_skipped" ; rc_failed 3 ;;
-u) echo -e "$rc_unused" ; rc_failed 3 ;;
*) echo "rc_status: Usage: [-v[] [-r]|-s|-u]" 1>&2 ; return 0 ;;
esac
done
return $_rc_status_ret
}
elif test -n "$_rc_todo" ; then
function rc_status ()
{
rc_check
test "$_rc_status" -gt 7 && rc_failed 1
_rc_status_ret=$_rc_status
case "$_rc_todo" in
stop)
# program is not running which
# is success if we stop service
test "$_rc_status" -eq 7 && rc_failed 0 ;;
esac
local i
for i ; do
case "$i" in
-v|-v[1-9]|-v[1-9][0-9])
local vrt=""
local out=1
local opt="en"
test -n "${i#-v}" && vrt="$vrt${esc}[${i#-v}A" || opt="e"
case "$_rc_status" in
0) vrt="$vrt$rc_done" ; ;; # success
1) vrt="$vrt$rc_failed" ; out=2 ;; # generic or unspecified error
2) vrt="$vrt$rc_failed" ; out=2 ;; # invalid or excess args
3) vrt="$vrt$rc_missed" ; out=2 ;; # unimplemented feature
4) vrt="$vrt$rc_failed" ; out=2 ;; # insufficient privilege
5) vrt="$vrt$rc_skipped"; out=2 ;; # program is not installed
6) vrt="$vrt$rc_unused" ; out=2 ;; # program is not configured
7) vrt="$vrt$rc_failed" ; out=2 ;; # program is not running
*) vrt="$vrt$rc_failed" ; out=2 ;; # unknown (maybe used in future)
esac
echo -$opt "$rc_save$vrt$rc_restore" 1>&$out
# reset _rc_status to 0 after verbose case
_rc_status=0 ;;
-r) rc_reset ;;
-s) echo -e "$rc_skipped" 1>&2 ; rc_failed 5 ;;
-u) echo -e "$rc_unused" 1>&2 ; rc_failed 6 ;;
*) echo "rc_status: Usage: [-v[] [-r]|-s|-u]" 1>&2 ; return 0 ;;
esac
done
return $_rc_status_ret
}
else
function rc_status ()
{
rc_check
_rc_status_ret=$_rc_status
local i
for i ; do
case "$i" in
-v|-v[1-9]|-v[1-9][0-9])
local vrt=""
local out=1
local opt="en"
test -n "${i#-v}" && vrt="$vrt${esc}[${i#-v}A" || opt="e"
case "$_rc_status" in
0) vrt="$vrt$rc_done" ; ;; # success
*) vrt="$vrt$rc_failed"; out=2 ;; # failed
esac
echo -$opt "$rc_save$vrt$rc_restore" 1>&$out
# reset _rc_status to 0 after verbose case
_rc_status=0 ;;
-r) rc_reset ;;
-s) echo -e "$rc_skipped" ; return 0 ;;
-u) echo -e "$rc_unused" ; return 0 ;;
*) echo "rc_status: Usage: [-v[] [-r]|-s|-u]" 1>&2 ; return 0 ;;
esac
done
return $_rc_status_ret
}
fi
function rc_failed ()
{
rc_reset
case "$1" in
[0-7]) _rc_status=$1 ;;
"") _rc_status=1
esac
rc_check
return $_rc_status
}
function rc_exit ()
{
exit $_rc_status_all
}
function rc_confirm()
{
local timeout="30"
local answer=""
local ret=0
case "$1" in
-t) timeout=$2; shift 2 ;;
esac
local message="$@, (Y)es/(N)o/(C)ontinue? [y] "
: ${REDIRECT:=/dev/tty}
while true ; do
read -t ${timeout} -n 1 -p "${message}" answer < $REDIRECT > $REDIRECT 2>&1
case "$answer" in
[yY]|"") ret=0; break ;;
[nN]) ret=1; break ;;
[cC]) ret=2; break ;;
*) echo; continue
esac
done
echo
return $ret
}
function rc_active ()
{
local x
for x in /etc/init.d/*.d/S[0-9][0-9]${1} ; do
test -e $x || break
return 0
done
return 1
}
function rc_splash()
{
return 0
}
Lokale globale /etc/bash.bashrc.local
# bash completion for the `wp` command
_wp_complete() {
local OLD_IFS="$IFS"
local cur=${COMP_WORDS[COMP_CWORD]}
IFS=$'\n'; # want to preserve spaces at the end
local opts="$(wp cli completions --line="$COMP_LINE" --point="$COMP_POINT")"
if [[ "$opts" =~ \<file\>\s* ]]
then
COMPREPLY=( $(compgen -f -- $cur) )
elif [[ $opts = "" ]]
then
COMPREPLY=( $(compgen -f -- $cur) )
else
COMPREPLY=( ${opts[*]} )
fi
IFS="$OLD_IFS"
return 0
}
complete -o nospace -F _wp_complete wp
if [ "$PS1" ]; then
PS1='\u@\h:\w\$ '
ROTH="\[\033[1;31m\]"
ROT="\[\033[0;31m\]"
GRUEN="\[\033[0;32m\]"
BLAU="\[\033[0;34m\]"
YELLOW="\[\033[1;33m\]"
NOCOLOR="\[\033[0m\]"
[ "$UID" == "0" ] && USRCLR="$ROT\\u$NOCOLOR" || USRCLR="\\u"
PS1="${ROTH}Remote: $GRUEN\$(date +%H:%M:%S)h$ROTH@$YELLOW\h ${BLAU}[$GRUEN$USRCLR$ROTH@$ROTH${debian_chroot:+($debian_chroot)}$GRUEN\w${BLAU}]\n$NOCOLOR#"
shopt -s checkwinsize
# You may uncomment the following lines if you want `ls' to be colorized:
export LS_OPTIONS='--color=auto'
eval "`dircolors`"
alias ls='ls $LS_OPTIONS'
alias ll='ls $LS_OPTIONS -l'
alias l='ls $LS_OPTIONS -lA'
alias mce='mcedit'
if [ -f /etc/bash_completion ]; then
. /etc/bash_completion
fi
if [ -f /etc/bash.aliases ]; then
. /etc/bash.aliases
fi
export LANG=de_DE.UTF-8
. /etc/rc.status
echo -en "\033[1m"
echo "${done}"
echo "UPTIME / SYSINFOS :"
echo ""
echo "___________________________________________________________________________"
echo ""
uptime
echo -en "\033[1m"
echo "___________________________________________________________________________"
echo "${norm}"
/usr/local/bin/checkspace
echo ""
echo -en "\033[1m"
fi
if [ $UID != 0 ]
then
echo ""
echo -en "\033[1m"
echo -en "\033[34m"
cal
echo -en "${done}"
else
echo -en "\033[0;31m"
echo "_________________________"
echo "| |"
echo "| root weiss was er tut! |"
echo "|________________________|"
echo ""
fi
export HISTTIMEFORMAT='%F %T '
export HISTSIZE=150000
export HISTSIZEFILE=150000
export LANG=de_DE.UTF-8
export LANGUAGE=
export LC_CTYPE="de_DE.UTF-8"
export LC_NUMERIC="de_DE.UTF-8"
export LC_TIME="de_DE.UTF-8"
export LC_COLLATE="de_DE.UTF-8"
export LC_MONETARY="de_DE.UTF-8"
export LC_MESSAGES="de_DE.UTF-8"
export LC_PAPER="de_DE.UTF-8"
export LC_NAME="de_DE.UTF-8"
export LC_ADDRESS="de_DE.UTF-8"
export LC_TELEPHONE="de_DE.UTF-8"
export LC_MEASUREMENT="de_DE.UTF-8"
export LC_IDENTIFICATION="de_DE.UTF-8"
export LC_ALL="de_DE.UTF-8"
Anpassung locale:
sed -i "s/# de_DE.UTF-8 UTF-8/de_DE.UTF-8 UTF-8/" /etc/locale.gen
locale-gen
Falls beim SSH login folgende Meldung auftaucht:
Offending key for IP in /home/${user}/.ssh/known_hosts:220
oder
Offending key for IP in /etc/ssh/ssh_known_hosts:8
ist folgendes zu tun:
sed -i '220d' ~/.ssh/known_host
bzw.
sed -i '8d' /etc/ssh/ssh_known_hosts
Notwendige Kernel-Module Client, ib_isert würde nicht benötigt, wird aber dennoch mit geladen:
mlx4_en               118784  0
mlx4_ib               196608  0
ib_uverbs             126976  32 mlx4_ib,rdma_ucm
ib_core               311296  13 rdma_cm,ib_ipoib,rpcrdma,mlx4_ib,ib_srp,iw_cm,ib_iser,ib_umad,ib_isert,rdma_ucm,ib_uverbs,ib_cm
mlx4_core             307200  2 mlx4_ib,mlx4_en
Notwendige Kernel-Module Server:
mlx4_en               118784  0
mlx4_ib               196608  0
ib_uverbs             126976  32 mlx4_ib,rdma_ucm
ib_core               311296  13 rdma_cm,ib_ipoib,rpcrdma,mlx4_ib,ib_srp,iw_cm,ib_iser,ib_umad,ib_isert,rdma_ucm,ib_uverbs,ib_cm
mlx4_core             307200  2 mlx4_ib,mlx4_en
Interfaces /etc/network/interfaces, je Mellanox Infiniband ein eigenes Subnetz:
# network interface settings; autogenerated
# Please do NOT modify this file directly, unless you know what
# you're doing.
#
# If you want to manage parts of the network configuration manually,
# please utilize the 'source' or 'source-directory' directives to do
# so.
# PVE will preserve these directives, but will NOT read its network
# configuration from sourced files, so do not attempt to move any of
# the PVE managed interfaces into external files!

auto lo
iface lo inet loopback
iface eno3 inet manual

iface eno1 inet manual

iface eno4 inet manual

iface eno2 inet manual

auto bond0
iface bond0 inet manual
 bond-slaves eno1 eno2
 bond-miimon 100
 bond-mode 802.3ad
 bond-xmit-hash-policy layer3+4
 #SFP+ Bond

auto vmbr1
iface vmbr1 inet static
 address 10.40.2.100/24
 bridge-ports eno3
 bridge-stp off
 bridge-fd 0
 # gateway 10.40.2.1

#Proxmox INFRASTRUCTURE/FAILOVER1
auto vmbr0
iface vmbr0 inet static
 address 10.40.0.100/24
 bridge-ports bond0
 bridge-stp off
 bridge-fd 0
 bridge-vlan-aware yes
 bridge-vids 2-4094
 #Bonding Bridge VMs
auto vmbr1:0
iface vmbr1:0 inet static
 address 192.168.0.100/24
 gateway 192.168.0.1
 #Temporary IP alias
 auto vmbr2
 iface vmbr2 inet static
 address 10.40.7.100/24
 bridge-ports eno4
 bridge-stp off
 bridge-fd 0

#Proxmox FAILOVER2
auto ibp3s0
iface ibp3s0 inet static
 address 10.40.10.100/24
 pre-up echo connected > /sys/class/net/ibp3s0/mode
 post-up /usr/sbin/ip link set ibp3s0 mtu 4092
 post-up echo 1 > /proc/sys/net/ipv4/conf/all/arp_ignore
 post-up echo 2 > /proc/sys/net/ipv4/conf/all/arp_announce
 post-up echo 1 > /proc/sys/net/ipv4/conf/ibp3s0/arp_ignore

auto ibp4s0
iface ibp4s0 inet static
 address 10.40.20.100/24
 pre-up echo connected > /sys/class/net/ibp4s0/mode
 post-up /usr/sbin/ip link set ibp4s0 mtu 4092
 post-up echo 1 > /proc/sys/net/ipv4/conf/all/arp_ignore
 post-up echo 2 > /proc/sys/net/ipv4/conf/all/arp_announce
 post-up echo 1 > /proc/sys/net/ipv4/conf/ibp4s0/arp_ignore

auto ibp3s0d1
iface ibp3s0d1 inet static
 address 10.40.30.100/24
 pre-up echo connected > /sys/class/net/ibp3s0d1/mode
 post-up /usr/sbin/ip link set ibp3s0d1 mtu 4092
 post-up echo 1 > /proc/sys/net/ipv4/conf/all/arp_ignore
 post-up echo 2 > /proc/sys/net/ipv4/conf/all/arp_announce
 post-up echo 1 > /proc/sys/net/ipv4/conf/ibp3s0d1/arp_ignore

auto ibp4s0d1
iface ibp4s0d1 inet static
 address 10.40.40.100/24
 pre-up echo connected > /sys/class/net/ibp4s0d1/mode
 post-up /usr/sbin/ip link set ibp4s0d1 mtu 4092
 post-up echo 1 > /proc/sys/net/ipv4/conf/all/arp_ignore
 post-up echo 2 > /proc/sys/net/ipv4/conf/all/arp_announce
 post-up echo 1 > /proc/sys/net/ipv4/conf/ibp4s0d1/arp_ignore
Einträge in /etc/hosts aller Cluster-Knoten, um unnötige DNS-Abfragen zu vermeiden:
127.0.0.1 localhost.localdomain localhost
10.40.2.100 pvecn0.pawott.de pvecn0
10.40.2.101 pvecn1.pawott.de pvecn1
10.40.2.102 pvecn2.pawott.de pvecn2
10.40.2.103 pvecn3.pawott.de pvecn3
10.40.2.104 pvecn4.pawott.de pvecn4
10.40.2.105 pvecn5.pawott.de pvecn5
10.40.2.106 pvecn6.pawott.de pvecn6
10.40.10.100 iscsi-portal.pawott.de iscsi-portal
10.40.20.100 iscsi-portal.pawott.de iscsi-portal

#10.40.30.100 iscsi-portal1.pawott.de iscsi-portal1
#10.40.20.100 iscsi-portal2.pawott.de iscsi-portal2

# The following lines are desirable for IPv6 capable hosts

::1 ip6-localhost ip6-loopback
fe00::0 ip6-localnet
ff00::0 ip6-mcastprefix
ff02::1 ip6-allnodes
ff02::2 ip6-allrouters
ff02::3 ip6-allhosts
Anlegen der /etc/modules-load.d/mellanox.conf zum Laden der Module:
mlx4_core
mlx4_ib
mlx4_en
ib_core
#ib_addr
#ib_sa
ib_cm
rdma_cm
rdma_ucm
ib_iser
#ib_isert
## IP over Infiniband
ib_ipoib
ib_umad
#ib_mad
rpcrdma
ib_srp
ib_isert
iw_cm
ib_uverbs
svcrdma
xprtrdma
Aktivierung von iSCSI über RDMA in /etc/rdma/modules/rdma.conf
# These modules are loaded by the system if any RDMA devices is installed
# iSCSI over RDMA client support
ib_iser

# iSCSI over RDMA target support
ib_isert

# User access to RDMA verbs (supports libibverbs)
ib_uverbs

# User access to RDMA connection management (supports librdmacm)
rdma_ucm

# RDS over RDMA support
# rds_rdma

# NFS over RDMA client support
xprtrdma

# NFS over RDMA server support
svcrdma
Port Typ Konfiguration:
for i in $(lspci | grep Mellanox | awk '{print $1}'); { echo "0000:$i ib ib" >>/etc/rdma/mlx4.conf; }
Deaktivierung von i40iw Devices in /etc/modprobe.d/mlx4.conf:
echo "blacklist i40iw" >> /etc/modprobe.d/mlx4.conf
Aktivieren der Exports des NFS-Server unter /etc/exports:
# /etc/exports: the access control list for filesystems which may be exported
# to NFS clients. See exports(5).
#
# Example for NFSv2 and NFSv3:
# /srv/homes hostname1(rw,sync,no_subtree_check) hostname2(ro,sync,no_subtree_check)
#
# Example for NFSv4:
# /srv/nfs4 gss/krb5i(rw,sync,fsid=0,crossmnt,no_subtree_check)
# /srv/nfs4/homes gss/krb5i(rw,sync,no_subtree_check)
#
/hddpool/NFS/ISO-Images 10.40.2.0/24(rw,no_root_squash,no_all_squash,sync,no_subtree_check)
/hddpool/NFS/ISO-Images 10.40.2.50(rw,no_root_squash,no_all_squash,sync,no_subtree_check)
/hddpool/NFS/ISO-Images 10.40.10.0/24(rw,no_root_squash,no_all_squash,sync,no_subtree_check)
/hddpool/NFS/ISO-Images 10.40.20.0/24(rw,no_root_squash,no_all_squash,sync,no_subtree_check)
/hddpool/NFS/ISO-Images 10.40.30.0/24(rw,no_root_squash,no_all_squash,sync,no_subtree_check)
/hddpool/NFS/ISO-Images 10.40.40.0/24(rw,no_root_squash,no_all_squash,sync,no_subtree_check)

/hddpool/NFS/Snapshots 10.40.2.0/24(rw,no_root_squash,no_all_squash,sync,no_subtree_check)
/hddpool/NFS/Snapshots 10.40.2.50(rw,no_root_squash,no_all_squash,sync,no_subtree_check)
/hddpool/NFS/Snapshots 10.40.10.0/24(rw,no_root_squash,no_all_squash,sync,no_subtree_check)
/hddpool/NFS/Snapshots 10.40.20.0/24(rw,no_root_squash,no_all_squash,sync,no_subtree_check)
/hddpool/NFS/Snapshots 10.40.30.0/24(rw,no_root_squash,no_all_squash,sync,no_subtree_check)
/hddpool/NFS/Snapshots 10.40.40.0/24(rw,no_root_squash,no_all_squash,sync,no_subtree_check)

von Ralf Schweiger | Juni 25, 2019 | Debian, Hardware, Linux, Proxmox, Supermicro, Virtualsierung
IPMI Firmware Download von Supermicro:
https://www.supermicro.com/support/bios/firmware.aspx
https://www.supermicro.com/about/policies/disclaimer.cfm?SoftwareItemID=2959
Auf dem Host muss das ipmitool installiert sein (hier Proxmox 5.4), falls IPMI zurück gesetzt werden muss.
apt-get install ipmitool
Via scp auf den Proxmox Server kopieren. Auf dem Host geht es weiter:
root@pvecn1:~# unzip IPMI_SMM_X9_2_59.zip
Archive:  IPMI_SMM_X9_2_59.zip
  inflating: SMM_X9_2_59.ima
  inflating: RKCSFlsh2.5.zip
  inflating: RLinFlsh2.9.zip
  inflating: RWinFlsh2.9.zip
  inflating: SMM_IPMI_AA.pdf
root@pvecn1:~# unzip RLinFlsh2.9.zip
Archive:  RLinFlsh2.9.zip
   creating: Linux_x86_32/
   creating: Linux_x86_64/
  inflating: Linux_x86_32/RLin32Flsh
  inflating: Linux_x86_32/libipmi.so.1
  inflating: Linux_x86_64/RLin64Flsh
  inflating: Linux_x86_64/libipmi.so.1
root@pvecn1:~# cd Linux_x86_64
root@pvecn1:~/Linux_x86_64# ls -la
total 306
drwxr-xr-x  2 root root      4 Dec 13  2011 .
drwx------ 10 root root     25 Jun  4 15:28 ..
-rwxr-xr-x  1 root root 482447 Dec 12  2011 libipmi.so.1
-rwxr-xr-x  1 root root  70528 Dec 13  2011 RLin64Flsh
root@pvecn1:~/Linux_x86_64# export LD_LIBRARY_PATH=.
root@pvecn1:~/Linux_x86_64# ./RLin64Flsh -nw -ip XXX.XXX.XXX.XXX -u ADMIN -p [SUPERGEHEIMES_PASSWORT] ../SMM_X9_2_59.ima
-------------------------------------------------
YAFUFlash - Firmware Upgrade Utility (Version 2.9)
-------------------------------------------------
(C)Copyright 2008, American Megatrends Inc.

Creating IPMI session via network with address 172.20.24.73...Done
UBOOT Versions is different Updating of UBOOT is recommended
So,Type (Y/y) to Update UBOOT
or (N/n) to Skip
Enter your Option : Y

****************************************************************************
 WARNING!
        FIRMWARE UPGRADE MUST NOT BE INTERRUPTED ONCE IT IS STARTED.
        PLEASE DO NOT USE THIS FLASH TOOL FROM THE REDIRECTION CONSOLE.
****************************************************************************
Preserving Env Variables... done
Uploading Firmware Image : 100%... done
Flashing Firmware Image : 100%... done
Verifying Firmware Image : 100%... done
Setting Env variables ... done
Resetting the firmware..........

root@pvecn3:~/Linux_x86_64# ipmitool lan set 1 ipsrc static
root@pvecn3:~/Linux_x86_64# ipmitool lan set 1 ipaddr XXX.XXX.XXX.XXX
Setting LAN IP Address to XXX.XXX.XXX.XXX
root@pvecn3:~/Linux_x86_64# ipmitool lan set 1 netmask 255.255.255.0
Setting LAN Subnet Mask to 255.255.255.0
root@pvecn3:~/Linux_x86_64# ipmitool lan set 1 defgw ipaddr XXX.XXX.XXX.XXX
Setting LAN Default Gateway IP to 172.20.24.1
root@pvecn3:~/Linux_x86_64# ipmitool mc reset cold
Falls vom letzten Setup noch ein Chassis Intrusion Detection ansteht, kann dieser zurück gesetzt werden:
root@pvecn1:~/Linux_x86_64# ipmitool raw 0x30 0x03
Für den Fall, dass das Passwort zurück gesetzt werden muss, macht man einen Factory Reset:
root@pvecn1:~# wget ftp://ftp.supermicro.com/utility/IPMICFG/IPMICFG_1.29.0_build.181029.zip
root@pvecn1:~# unzip IPMICFG_1.29.0_build.181029.zip
root@pvecn1:~ cd IPMICFG_1.29.0_build.181029/Linux/64bit# ./IPMICFG-Linux.x86_64 -fd

von Ralf Schweiger | Mai 16, 2019 | Proxmox, Virtualsierung
Um die Meldung zur fehlenden Subscription beim Login los zu werden, ist aktuell ein Eintrag in der crontab vorzunehmen:
0 0 * * * root sed -i.bak "s/data.status !== 'Active'/false/g" /usr/share/javascript/proxmox-widget-toolkit/proxmoxlib.js && systemctl restart pveproxy.service
Eine Subscription legen wir uns gerne für Produktivumgebungen bei Kunden zu.
von Ralf Schweiger | Mai 15, 2019 | Bareos-Server, Debian, Free BSD, Free NAS, Hardware, Infiniband, Linux, Virtualsierung
Wenn Proxmox im Cluster laufen soll, benötigt es ein shared storage. Das kann NFS sein oder besser iSCSI. Für Performance ist letztendlich entscheidend das Layout des Storage-Pools und eine möglichst latenzarme Anbindung. Fiberchannel oder Infiniband sind hier die Kandidaten der Wahl. Letzteres hat allerdings die Nase vorn, wenn es um Bandbreite geht und es ist ausgereift, da es im High-Perfomance-Computing schon sehr lange im Einsatz ist. Infiniband kennen wir zudem aus dem HP POD Supercomputing Projekt bei Airbus (damals die Nr.10 auf top500.org).
Da die Auswahl an Storage-Systemen mit Infiniband-Unterstützung dünn und im bezahlbaren Bereich quasi nicht vorhanden ist, haben wir beschlossen, selbst ein Storage zu entwickeln.
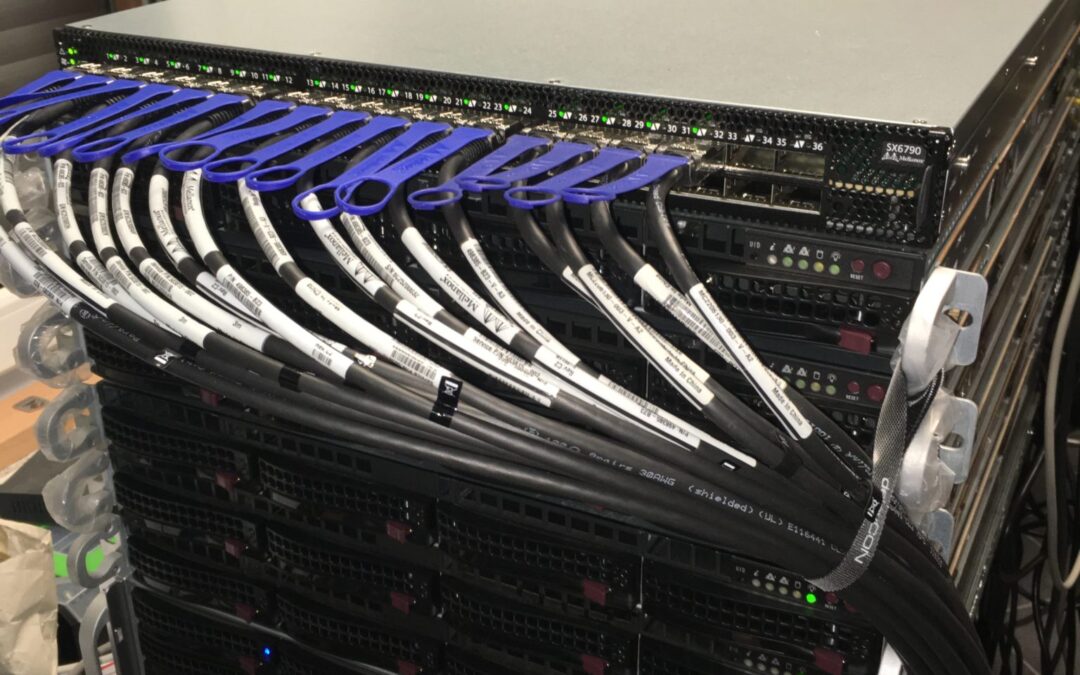
Als Hardware-Basis für Storage, Virtualisierungsplattform und Backup dienen unsere bewährten getcom Superserver Green-IT-Serie der Generation 7 & 8, Voltaire Infiniband Grid Director 4036E und Cisco Switche aus der SG550X Serie.
Alle Server (Storage und Cluster-Knoten) sind mit je zwei Intel XEONs 3,2GHz und 256GB ECC RAM bestückt und laufen auf aktuellen Supermicro Boards. Für den Netzwerkstack haben alle Server neben IPMI und Dual 10GbE je eine Dual Infiniband und eine Intel X710 SFP+ Karte mit an Bord. Die Betriebssysteme laufen auf gespiegelten Intel DC SSDs. Auf dem Storage-Server ist dazu auf der Rückseite ein hotplugfähiges 2,5″ Dual Bay integriert.
Das Herzstück des I/O-Systems für Storage- & Backup-Systeme, speziell geflashte HCAs, Dual SFP+ Ethernet 10GbE, Dual Infiniband 40Gbit mit gespiegelten PCIe NAND Flash Modulen, garantiert ordentlichen Durchsatz bei minimaler Latenz:

Die Frage nach dem Filesystem hat sich schnell beantwortet: ZFS soll es sein.
Die Vorteile sind:
- schnelle Rebuildzeit (resilver), da nur die belegten Blöcke übertragen werden
- schnelle Pool-Initialisierung, auch 140TB sind in wenigen Minuten initialisiert
- die Datenintegrität ist bei ZFS immer garantiert, d.h. ein Block wird so ausgeliefert, wie er gespeichert wurde
- einfache Poolerweiterung durch größere Ersatz-Platten
- einfacher Pool-Import inklusive ACLs, Snaphots, etc., der Platten auf neuer Hardware, wenn ZFS Version gleich oder größer ist auf dem Zielsystem bei unrelevanter Plattenfolge
Aktuelle ZFS basierte Systeme, die geeignet sind, sind FreeNAS 11.2 oder OmniOSce in Verbindung mit Napp-IT.
OmniOSce/Napp-IT ist im Grunde ein Abkömmling von Solaris Version 10 => OpenSolaris => illumos / OpenIndiana und damit ein direkter Nachfahre vom Unix System V. Da es unter FreeNAS/FreeBSD einige Überraschungen in Verbindung mit HA, Infiniband und iSCSI gab, werden wir uns bei Gelegenheit OmniOSce und Napp-IT in einer eigenen Analyse näher ansehen. Die PoC-Hardware dazu steht schon bereit. Mehr dazu in einem der nächsten Blogs.
Da FreeNAS nun über OpenZFS und auch über Mellanox Infiniband Treiber verfügt, gehen wir es an.
FreeNAS Setup
Die Installation wird als erledigt vorausgesetzt. Wir haben lediglich die beiden Intel Datacenter SSDs als Spiegel für die Installation ausgewählt. Wichtig ist, dass im BIOS auf UEFI umgestellt ist vor der Installation. Anschließend ist der Hostname zu vergeben, die beiden SFP+ Ports zu lagg0 (LACP), die beiden internen 10GbE Ports zu lagg1 (LACP) zusammen zu schalten. Mehr ist hier erst einmal nicht zu tun. Auf Cisco-Seite müssen innerhalb des Stacks auf den Core und den Management Switchen ebenfalls die entsprechend verwendeten Ports unter Link Aggregation zu einem lagg zusammen geschaltet werden. Für die Stack-Implementierung ist je Switch die Cisco Tesla Hybrid Firmware in der aktuellen Version zu flashen, wenn sich verschiedene Typen im Stack befinden sollen.
ZFS
Ein Blick auf das OpenZFS, welches FreeNAS mitbringt, verrät uns, dass es nah dran ist am aktuellen Oracle ZFS, die fehlende Verschlüsselung fällt auf, womit wir aber erst mal leben können:
root@freenas1[~]# zpool upgrade -v
This system supports ZFS pool feature flags.

The following features are supported:

FEAT DESCRIPTION
-------------------------------------------------------------
async_destroy                         (read-only compatible)
     Destroy filesystems asynchronously.
empty_bpobj                           (read-only compatible)
     Snapshots use less space.
lz4_compress
     LZ4 compression algorithm support.
multi_vdev_crash_dump
     Crash dumps to multiple vdev pools.
spacemap_histogram                    (read-only compatible)
     Spacemaps maintain space histograms.
enabled_txg                           (read-only compatible)
     Record txg at which a feature is enabled
hole_birth
     Retain hole birth txg for more precise zfs send
extensible_dataset
     Enhanced dataset functionality, used by other features.
embedded_data
     Blocks which compress very well use even less space.
bookmarks                             (read-only compatible)
     "zfs bookmark" command
filesystem_limits                     (read-only compatible)
     Filesystem and snapshot limits.
large_blocks
     Support for blocks larger than 128KB.
sha512
     SHA-512/256 hash algorithm.
skein
     Skein hash algorithm.
device_removal
     Top-level vdevs can be removed, reducing logical pool size.
obsolete_counts                       (read-only compatible)
     Reduce memory used by removed devices when their blocks are freed or remapped.
zpool_checkpoint                      (read-only compatible)
     Pool state can be checkpointed, allowing rewind later.

The following legacy versions are also supported:

VER  DESCRIPTION
---  --------------------------------------------------------
 1   Initial ZFS version
 2   Ditto blocks (replicated metadata)
 3   Hot spares and double parity RAID-Z
 4   zpool history
 5   Compression using the gzip algorithm
 6   bootfs pool property
 7   Separate intent log devices
 8   Delegated administration
 9   refquota and refreservation properties
 10  Cache devices
 11  Improved scrub performance
 12  Snapshot properties
 13  snapused property
 14  passthrough-x aclinherit
 15  user/group space accounting
 16  stmf property support
 17  Triple-parity RAID-Z
 18  Snapshot user holds
 19  Log device removal
 20  Compression using zle (zero-length encoding)
 21  Deduplication
 22  Received properties
 23  Slim ZIL
 24  System attributes
 25  Improved scrub stats
 26  Improved snapshot deletion performance
 27  Improved snapshot creation performance
 28  Multiple vdev replacements

For more information on a particular version, including supported releases,
see the ZFS Administration Guide.
root@freenas1[~]
Infiniband
Testweise manuelles Laden der Module für Infiniband unter FreeNAS/FreeBSD:
root@freenas1[~]# kldload mlx4
kldload: can't load mlx4: module already loaded or in kernel
root@freenas1[~]# kldload mlx4ib
root@freenas1[~]# kldload ipoib
root@freenas1[~]
Das aktiviert schon einmal die Karten, die uns mit Aufleuchten der orangen und grünen LEDs signalisieren, dass die Treiber geladen und die Karten einsatzbereit sind.
Das permanente Laden erfolgt in FreeBSD über die /boot/loader.conf.local.
Anders als unter FreeBSD wird allerdings die local Datei bei Updates oder Änderungen in den Tuneables (loader) gnadenlos überschrieben. FreeNAS ist eine Appliance und somit muss man Änderungen immer über die GUI vornehmen. Das gilt für alle Appliances, nebenbei auch für pfSense. Die loader Config darf deshalb nicht manuell editiert werden, da sie vom System früher oder später überschrieben werden wird.
Die korrekte Vorgehensweise ist über die GUI => System => Tunables => Add zu gehen und die entsprechenden Werte für die beiden loader einzutragen.
Nach dem Speichern finden wir unsere loader an gewohnter Stelle wieder:
root@freenas1[~]# cat /boot/loader.conf.local
mlx4ib_load="YES" # Be sure that Kernel modul Melloanox 4 Infiniband will be loaded
ipoib_load="YES" # Be sure that Kernel modul IP over Infiniband will be loaded
kernel="kernel"
module_path="/boot/kernel;/boot/modules;/usr/local/modules"
kern.cam.ctl.ha_id=0
root@freenas1[~]
Unter FreeBSD/FreeNAS kann für IP über Infiniband keine der bekannten Loadbalancer Methoden, wie Round Robin oder LACP verwendet werden. Da wir aber iSCSI für die Virtualisierungshosts, bzw. für das Proxmox-Cluster und den VMs einsetzen möchten, ist zwingend für die Erhöhung des Durchsatzes und für die Ausfallsicherheit zu sorgen.
Damit sind wir auch gleich schon beim Thema Multipath angelangt:
Multipath
Etwas Theorie dazu, wenn es lieber mehr sein darf:
Für Multipath ist je Netzwerk Gerät eine IP aus einem eigenen Subnet zu verwenden. Da wir die Infiniband-Netze weder routen, noch für andere Zwecke, außer latenzarm iSCSI zur Verfügung stellen wollen, verwenden wir neue Subnetze, außerhalb der bisher verwendeten.
In unserem Fall 10.20.24.0/24 für ib0 und 10.20.25.0/24 für ib1. Falls zwei HCAs mit je zwei Ports eingesetzt werden, werden analog vier eigene Subnetze benötigt.
Bei FreeBSD ist der Infiniband Treiber standardmäßig auf connected mode (CM) aktiv, was bedeutet, dass TCP/IP zum Einsatz kommt. Dafür ist normalerweise die MTU auf 65520 einzustellen auf Server- und Client-Seite (Proxmox), um den maximalen Durchsatz zu ermöglichen.
Mit diesen Werten hatten wir allerdings Probleme auf der Client-Seite mit SCSI-Kernel-Fehler-Meldungen. Durch heran tasten haben wir eine MTU von 40950 als zuverlässig ermittelt. Die Ursache ist aktuell nicht ganz klar. Wir vermuten Buffer-Probleme innerhalb der Treiber-Implementierung. Das könnte der Grund sein, weshalb Mellanox die ConnectX-2 Karten nicht für FreeBSD frei gegeben hatte. Wir wollen im Zuge des OmniOSce PoC-Projektes vorher auch noch ConnectX-3 Karten unter FreeBSD testen. Möglicherweise erledigt sich das damit auch schon. Mehr dazu, wenn wir die spezifischen Tests abgeschlossen haben. Aktuell genügt uns das Setup, wie es ist, da wir insgesamt mit vier virtuellen Testmaschinen beim Performance-Test auf einen Gesamtdurchsatz von über. 3.000 MB/s kommen, was dem ermittelten maximalen Wert von 3.134 MB/s der gespiegelten Intel Optane SSDs bereits sehr nahe kommt. Faktisch geht nicht mehr viel raus zu holen.
Das Setup der Infiniband-Karte ib0 sieht damit folgendermaßen aus:
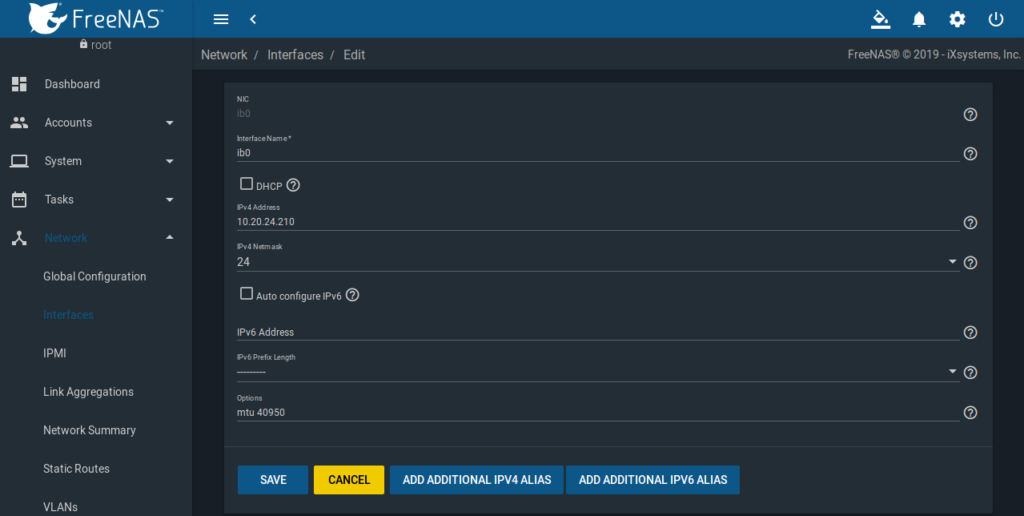
Analog dazu ist ib1 einzurichten.
Pool Setup
Für Performance ist ein RAID-Z Pool ungeeignet. Zum einen wird bei einem Rebuild dann von allen Platten gelesen, was die Performance extrem nach unten zieht, zum anderen zum anderen sind die Schreib-/Lesewerte damit nicht befriedigent.
Es ist daher dringend empfohlen, VDEVs aus je zwei gespiegelten Platten (Mirroring) zu einem Pool zusammen zu schalten. In unserem Setup sind das 16 HGST 10TB HE2 SAS3 Platten, also 8 VDEVs mit je zwei Platten im Spiegelverbund plus die zwei Intel Optanes zu einem Spiegel verbundenen VDEV als SLOG.
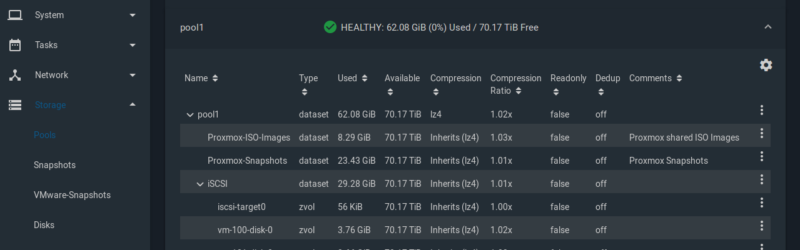
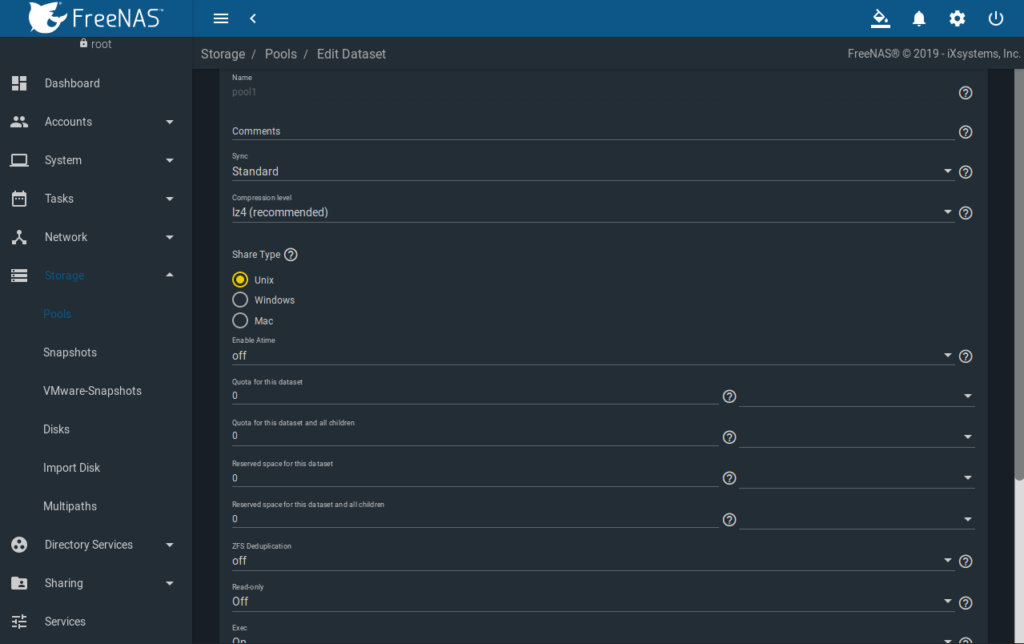
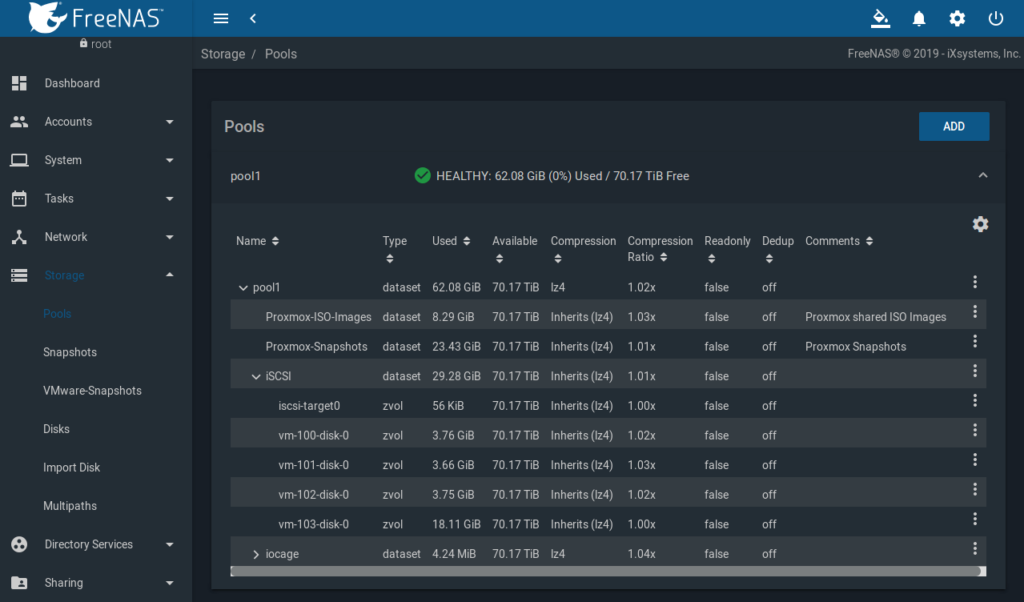
Der Pool hat als Sync-Methode „Standard“, „lz4“ als Kompression, der Share Type ist „Unix“, Atime ist „off“, Deduplication ist „off“, der Rest bleibt Default:
Im Pool werden dann drei Datasets benötigt, wobei die ersten beiden via NFS frei gegeben werden:
- Proxmox-ISO-Images
- Proxmox-Snapshots
- iSCSI
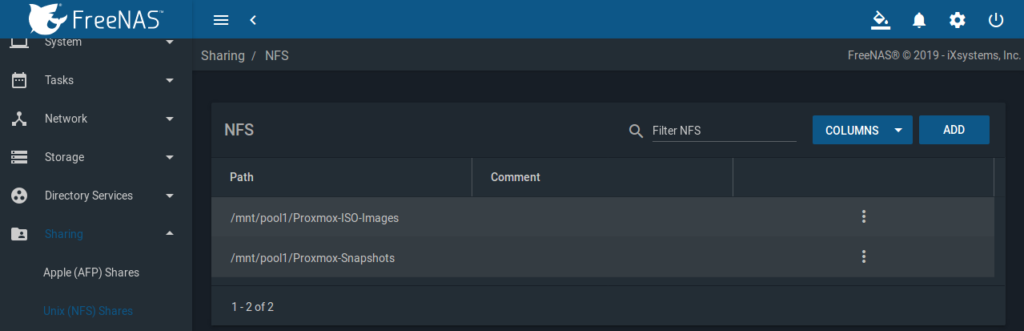
NFS Sharing
FreeNAS GUI => Sharing => Unix (NFS) Shares
Je Dataset Proxmox-* ist ein Share anzulegen mit aktiviertem All Dirs und mit den IPs der Proxmox-Cluster-Knoten aus dem SFP+ lagg0 Subnetz:
iSCSI Multipath Setup
Target Global Configuration
FreeNAS GUI => Sharing => Block (iSCSI) => Target Global Configuration:
Basename = iqn.2019-05.de.getcom.freenas1
Pool Availble Space Threshold (%) = 75

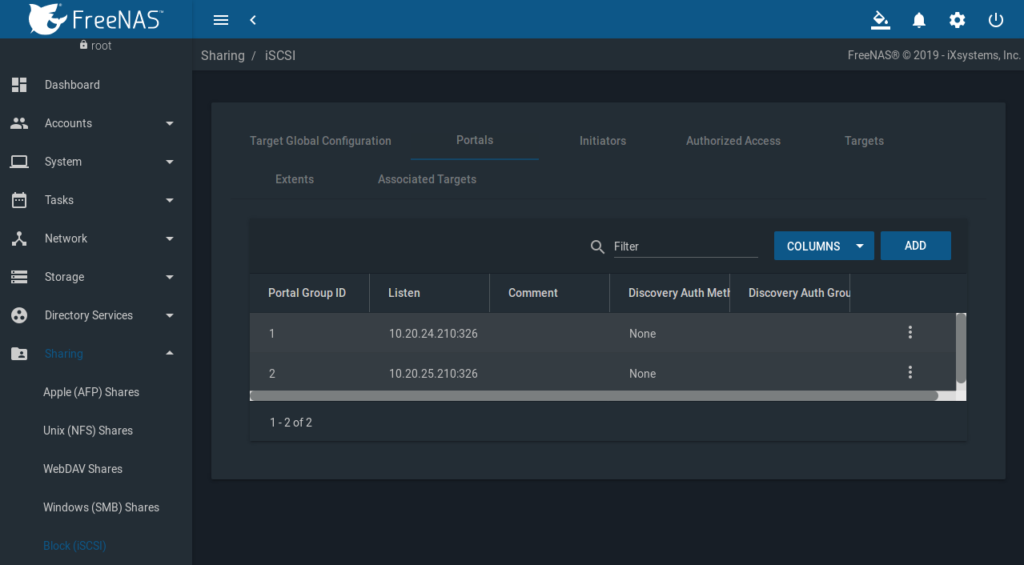
Portals
FreeNAS GUI => Sharing => Block (iSCSI) => Portals
Je Infiniband Subnet, bzw. IP, ist ein Portal zu erstellen.
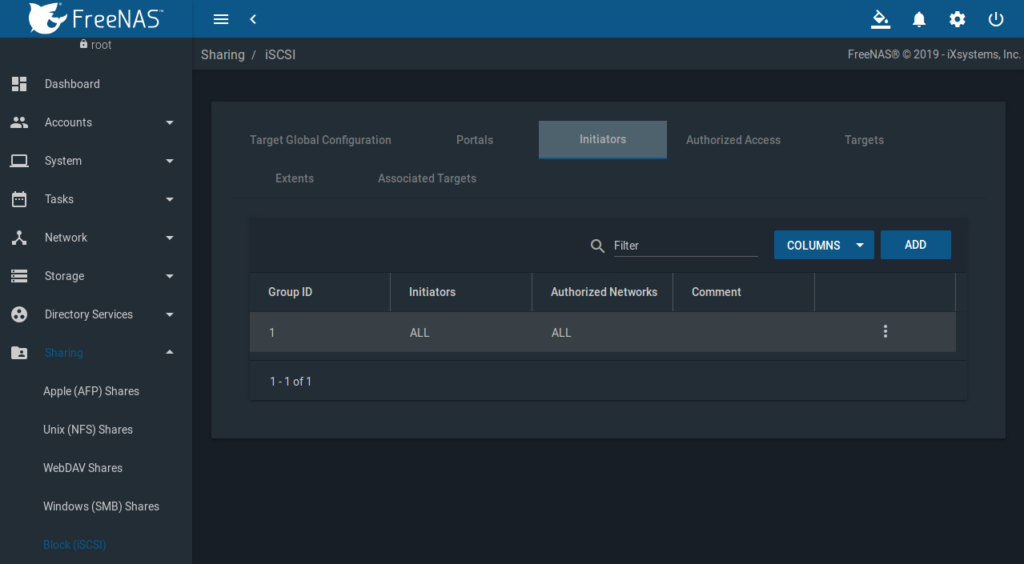
Initiators
FreeNAS GUI => Sharing => Block (iSCSI) => Initiators
Es wird ein Initator benötigt, zuerst einmal ohne Einschränkung (ALL/ALL):
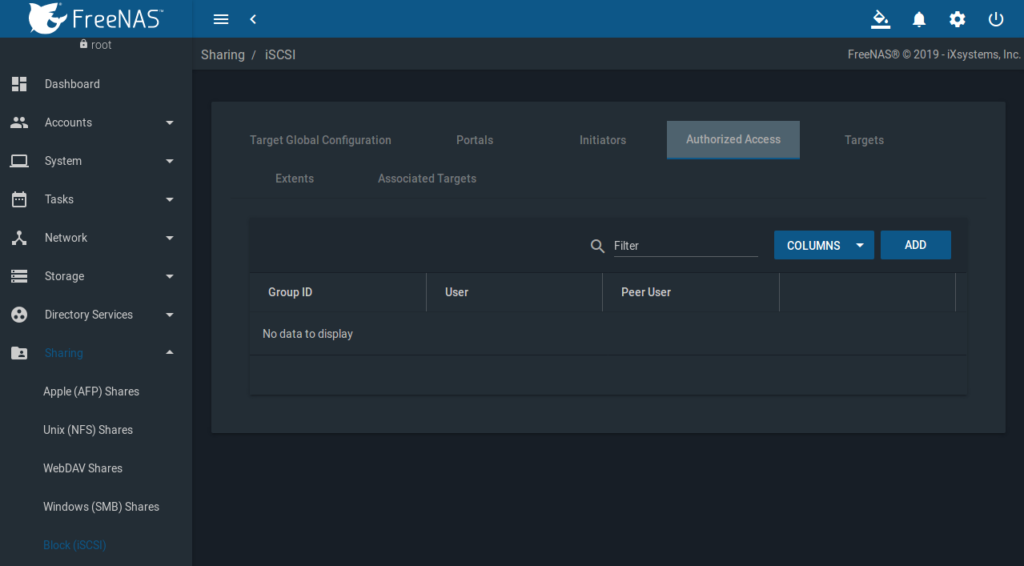
Authorized Access
FreeNAS GUI => Sharing => Block (iSCSI) => Authorized Access.
Keine Einschränkungen, das kann später geändert werden, wird aber nicht wirklich benötigt, da iSCSI nur auf den von Außen nicht erreichbaren Infiniband Subnetzen aktiv ist.
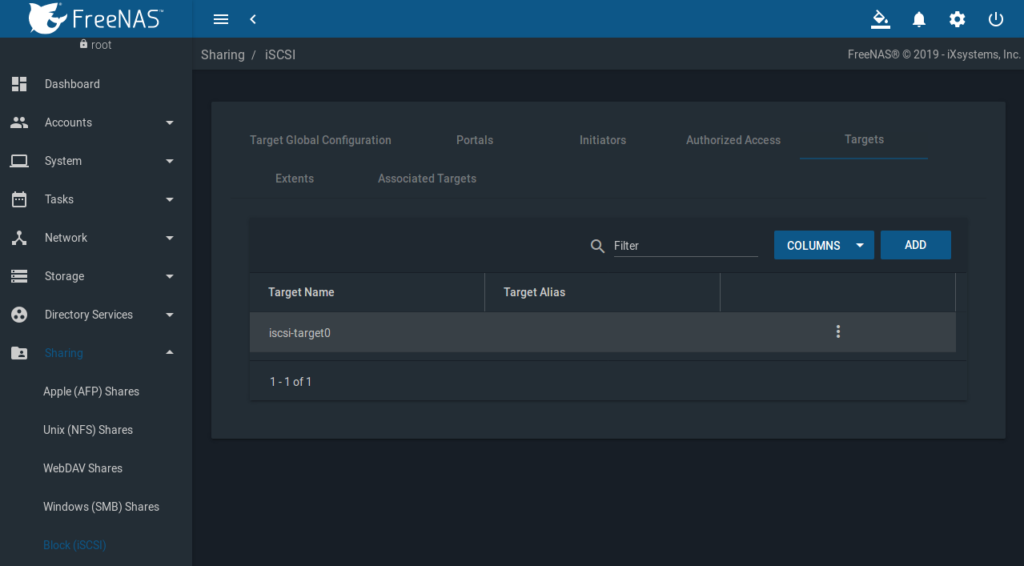
Targets
FreeNAS GUI => Sharing => Block (iSCSI) => Targets
Hier ist jetzt ein Target anzulegen. Der Name wird klein geschrieben und ist hier frei wählbar, kann also proxmox, proxmox0, iscsi oder wie in unserem Fall iscsi-target0 heißen. Dem Target sind beide Portal Group IDs „1“ + „2“ und die Initiator Group ID „1“ zuzuweisen:

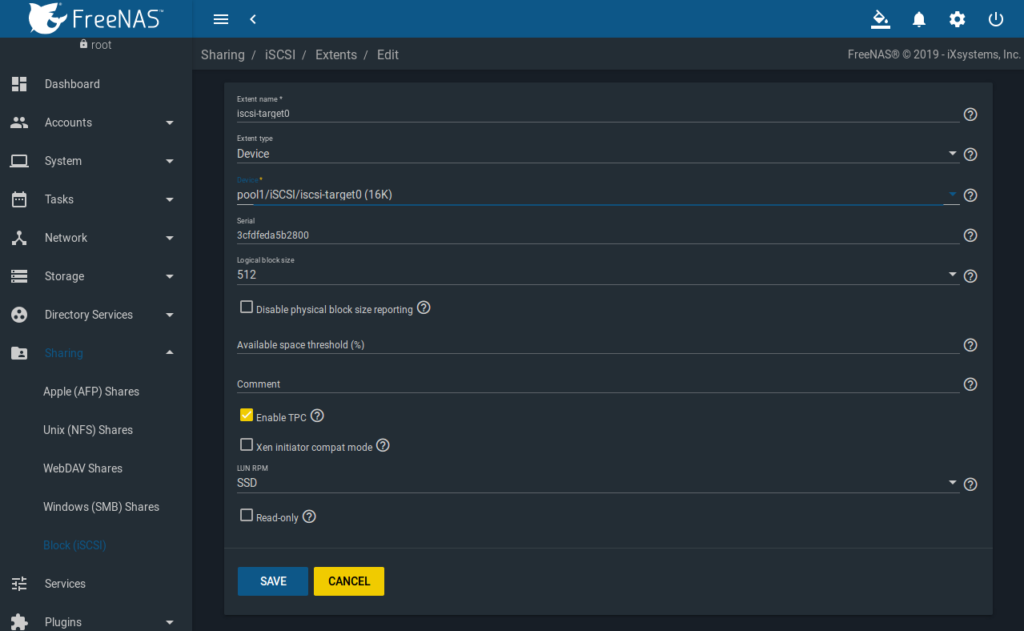
Extents
FreeNAS GUI => Sharing => Block (iSCSI) => Extents
Wie im Screenshot ersichtlich, entsprechend die Werte auswählen:
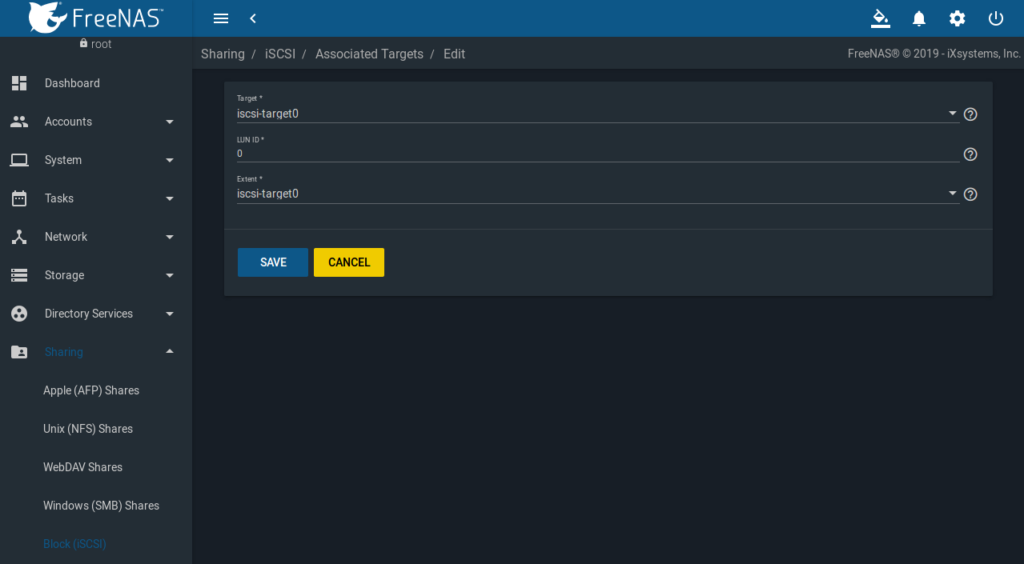
Associated Targets
FreeNAS GUI => Sharing => Block (iSCSI) => Associated Targets
Wie im Screenshot ersichtlich, entsprechend auswählen:
Damit ist das iSCSI Setup abgeschlossen.
Aktivierung des iSCSI und NFS Services
FreeNAS GUI => Services => iSCSI
FreeNAS GUI => Services => NFS
Start Automatically muss ausgewählt werden und den Schalter dann nach rechts ziehen:
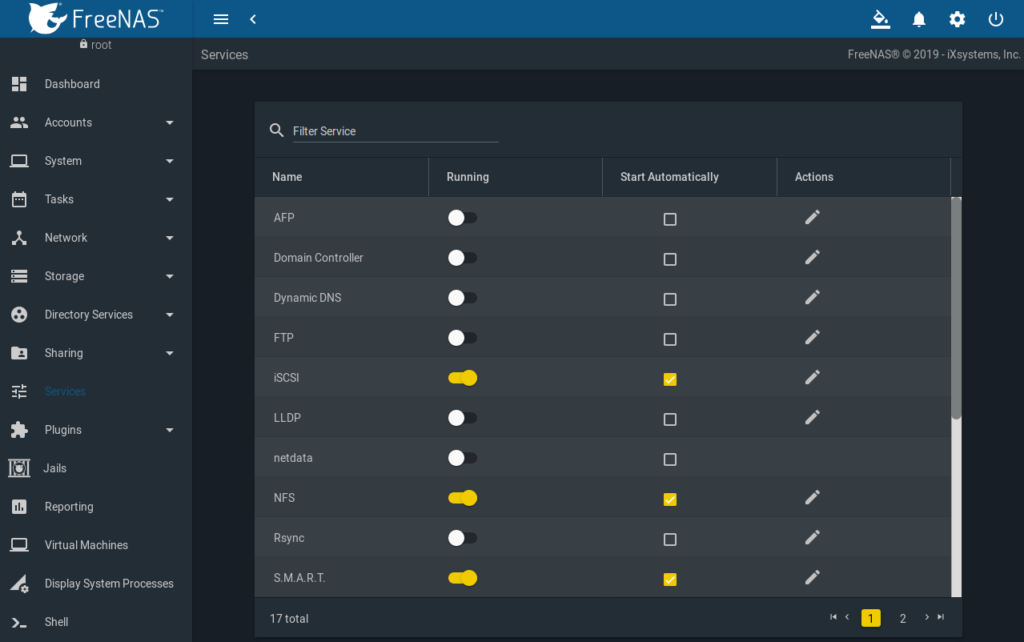
Damit ist das Setup auf der FreeNAS Seite abgeschlossen.
Proxmox Setup