von Ralf Schweiger | Okt. 9, 2025 | Allgemein, Proxmox
Effiziente Unterbindung von Spam über Mailing-Listen, z.B. von Google.


Da in der letzten Zeit Spammer neue Wege versuchen und Google- oder Mailgun-Mailinglisten anlegen und ungefragt eine große Anzahl von Empfänger-E-Mail-Adressen einfügen, um über diese Listen ihren Spam zu versenden, sind hier die Gegenmaßnahmen dazu.
Im Prinzip ist das ganz einfach. Alle E-Mails von Mailing-Listen enthalten entsprechende Header-Einträge, wie z.B. Mailing-list oder List-Unsubscribe.
Letzterer Header-Eintrag ist laut unseren Beobachtungen in allen Spam-E-Mails zu finden, die über verschiedene Mailing-Listen kommen.
In der Regel vermeiden wir Mailing-Listen, aus gegebenem Grund. Daher ist unser Weg, diese E-Mails komplett auszusperren.
Wird tatsächlich zukünftig eine Mailing-Liste benötigt werden, kann diese explizit frei geschaltet werden.
Wie das genau funktioniert, können wir in einem gesonderten Beitrag veröffentlichen, falls dies gewünscht wird.
Postfix
Voraussetzung bei Postfix ist das Paket postfix-policyd-spf-perl.
sudo apt install postfix-policyd-spf-perl
Weiterhin ist eine Datei /etc/postfix/header_checks anzulegen die folgende Zeile enthält:
/List-Unsubscribe:.*/ REJECT R200254 Mailing lists are not allowed
Generell macht es immer Sinn, für jede Regel eine Regel-Nummer, z.B hier R200254, nach REJECT einzufügen, um die anschlagende Regel in den Logs identifizieren zu können.
Die Aktivierung der header_checks in der main.cf in Postfix erfolgt durch folgenden Eintrag:
# The header_checks parameter specifies an optional table with patterns
# that each logical message header is matched against, including
# headers that span multiple physical lines.
#
# By default, these patterns also apply to MIME headers and to the
# headers of attached messages. With older Postfix versions, MIME and
# attached message headers were treated as body text.
#
# For details, see "man header_checks".
#
header_checks = regexp:/etc/postfix/header_checks
Um die Änderungen zu aktivieren, ist ein Postfix reload notwendig.
sudo systemctl reload postfix
Proxmox Mail Gateway
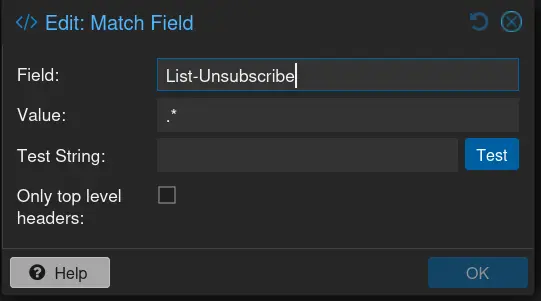
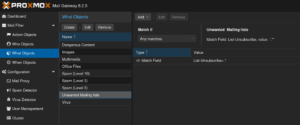
Für das Proxmox Mail Gateway muss eine Matching-Liste „Unwanted Mailing lists“ in „What“ eingefügt werden, mit Match-Field „List-Unsubscribe“ und value „.*“.

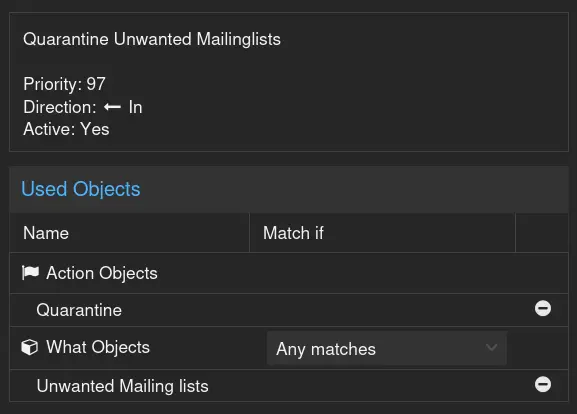
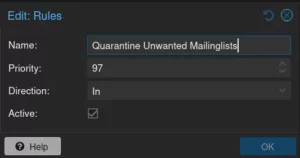
Weiterhin muss eine Regel „Quarantine Unwanted Mailinglists“ definiert werden mit einer Prio 97 und Direction „In“.
Diese Regel erhält als Action Object „Quarantine“ und als What Object „Unwanted Mailing lists“
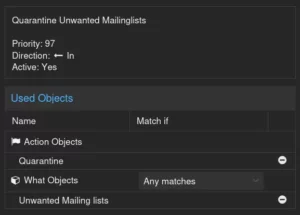
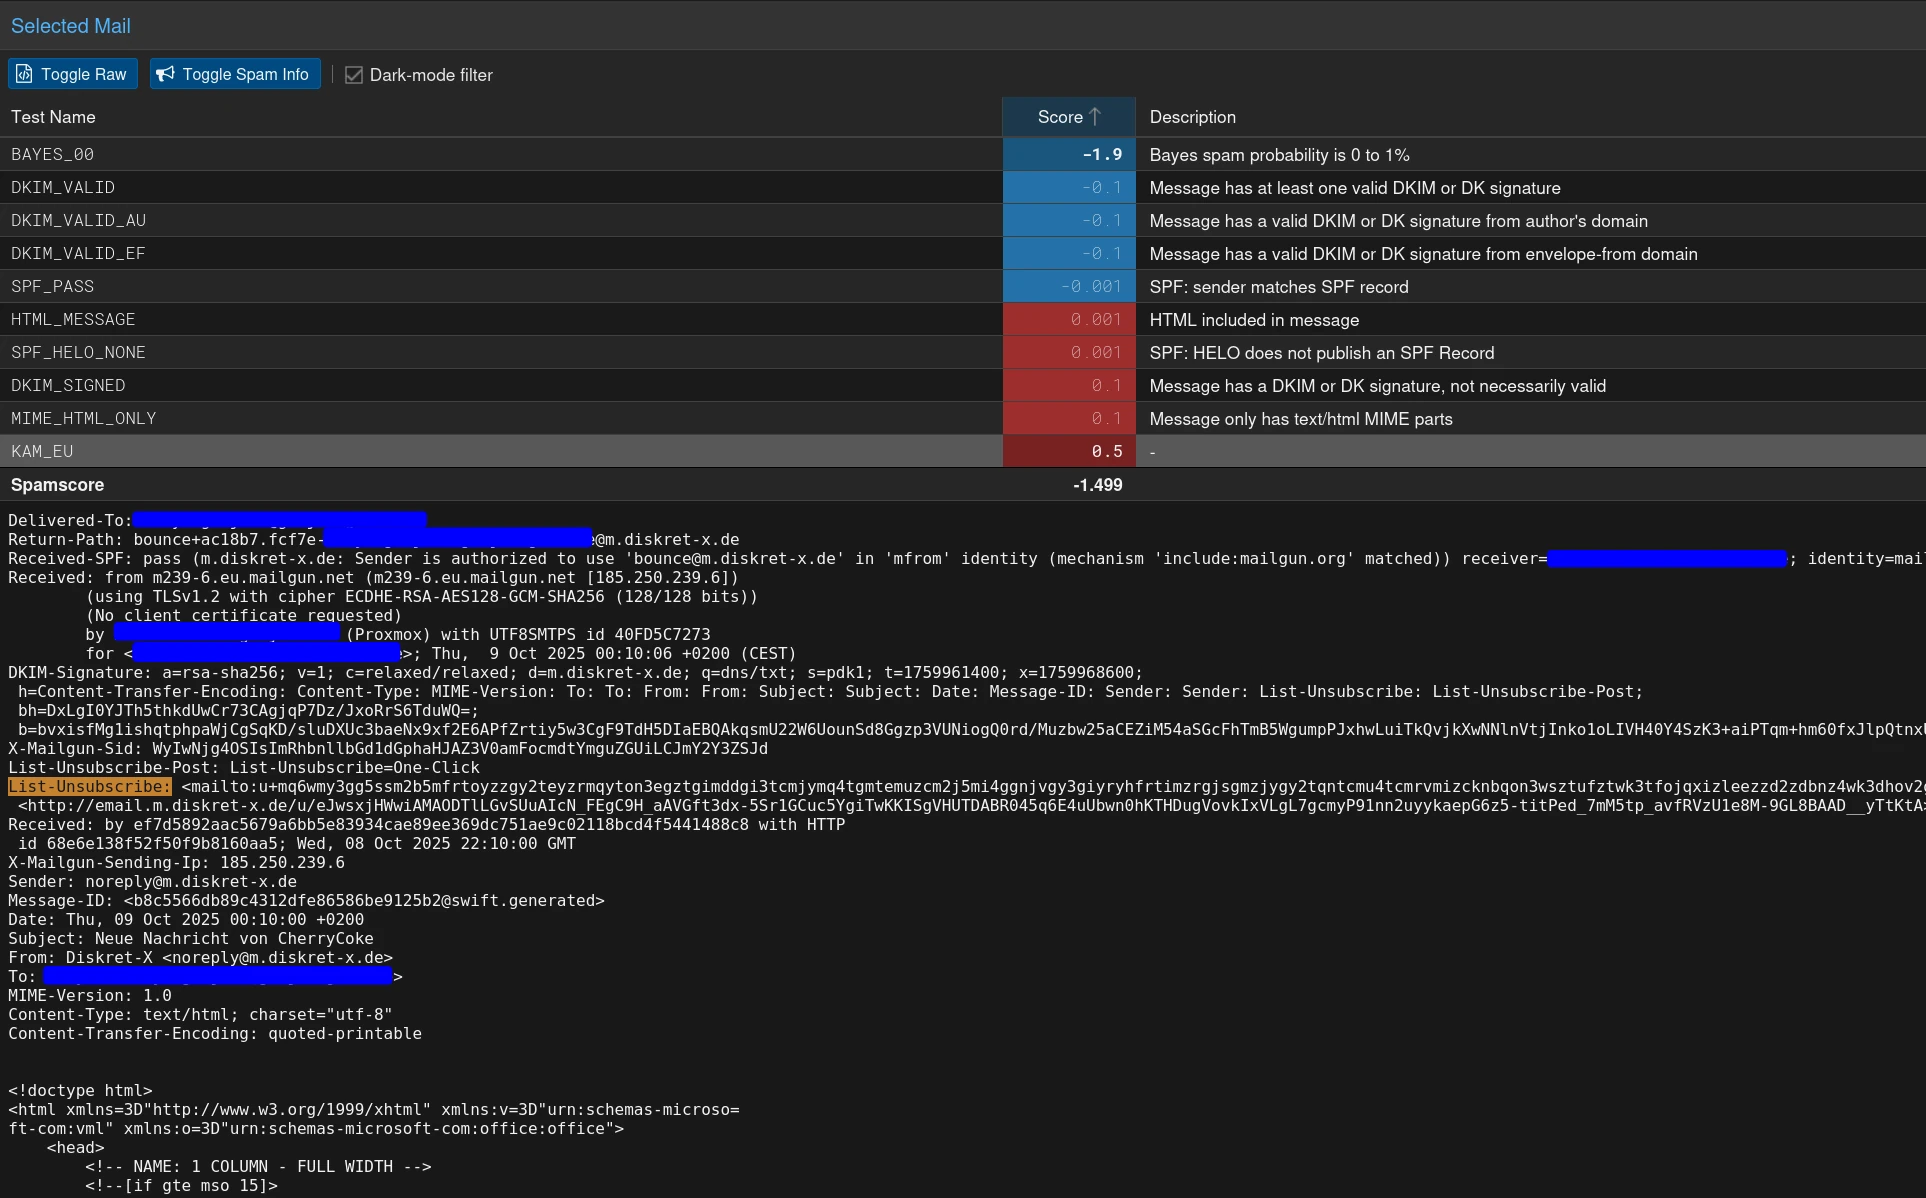
Als Ergebnis liefert Proxmox Mail Gateway Spam E-Mails direkt in die Quarantäne.
Das war es auch schon. Dadurch wird den Spammern auch dieser Weg blockiert.

von Ralf Schweiger | Jan. 23, 2025 | Allgemein, Computers, Debian, Linux, Proxmox, Virtualsierung, Windows 11
Das Ende von Windows 10 ist der Beginn von Windows 11.

Nach dem 14. Oktober 2025 wird Microsoft keine Updates mehr für Windows 8.1 und Windows 10 mehr zur Verfügung stellen.
Quelle: Microsoft kündigt Windows 8.1 und Windows 10 EOL an.
Da es neben inkompatibler Hardware, auf dem Windows 10 läuft und das man virtualisieren möchte, auch bestehende virtuelle Windows 10 Maschinen auf Proxmox VE gibt, die auf Windows 11 upgedated werden sollen oder müssen, ist hier das Step-by-Step-Upgrade-How-To.
Die Systemvoraussetzungen für Windows 11 sind folgende:
- 4 GB RAM
- 64GB Disk
- TPM 2.0
- UEFI
- Kompatible CPU
- u.a.
Die vollständige Liste ist hier zu finden: Microsoft Windows 11 Systemanforderungen.
Teil 1: Proxmox VE Upgrade

Wir brauchen also zuerst einmal Proxmox VE in der Version 8, da hier erstmals TPM 2.0 verfügbar ist und auch UEFI vollständig Windows 11 -fähig unterstützt wird.
Hier ist die Upgrade-Prozedur beschrieben: Proxmox VE 7 to 8
Zusammengefasst durchlaufen wir folgende Schritte:
Shutdown sämtlicher VMs und Container.
Proxmox 7 noninteraktiv auf den neuesten Stand bringen und Version ausgeben:
export DEBIAN_FRONTEND=noninteractive; apt update
yes '' | apt-get -y -o DPkg::options::="--force-confdef" -o DPkg::options::="--force-confold" upgrade
yes '' | apt-get -y -o DPkg::options::="--force-confdef" -o DPkg::options::="--force-confold" dist-upgrade
apt autoremove
pveversion
Proxmox 7to8 Check:
pve7to8
Dieser Schritt darf keine Fehler ausgeben. Falls doch, sind diese erst einmal zu beheben. Uns ist noch keiner unter gekommen.
Falls bei euch einer auftritt, bitte hier einen Kommentar hinterlassen.
Proxmox 8 Repo Upgrade:
sed -i 's/bullseye/bookworm/g' /etc/apt/sources.list /etc/apt/sources.list.d/pve-enterprise.list
Refresh Repo Index:
apt update
Upgrade auf Proxmox 8:
apt dist-upgrade
Das war es erst mal für Proxmox. Nach reboot steht die Proxmox VE in der Version 8 zur Verfügung.
Wie man physikalische Windows 10 Hardware virtualisiert, um es auf Windows 11 upzugraden, erspare ich uns erst mal.
Gegebenenfalls wird es dafür noch einen weiteren Beitrag geben, falls das von Interesse ist und ihr das in den Kommentaren wünscht.
Teil 2: Windows 10 vorbereiten: Disk nach GPT konvertieren
Ein essentieller Schitt für die Umstellung zu UEFI ist die Umwandlung der Windows vDisk von MBR auf GPT.
Am einfachsten geschieht das unter Windows selbst.
1. Dazu ist ein Command-Fenster (cmd) als Administrator zu starten.
2. Im Command-Fenster ist folgender Validierungsbefehl auszuführen:
mbr2gpt /validate /allowFullOS
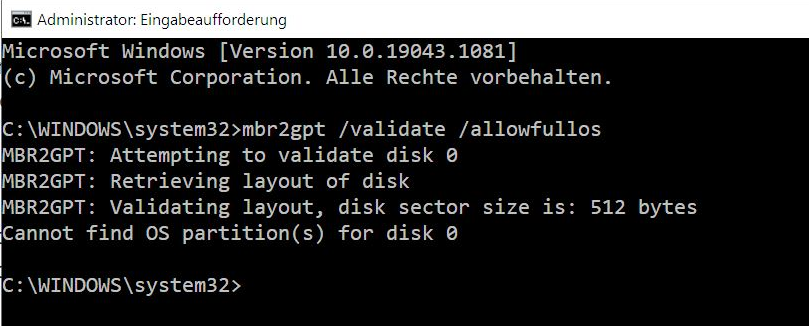
Falls dieser Befehl fehlerfrei beendet wurde, kann die Konvertierung der Disk nach GPT finalisiert werden durch folgenden Befehl:
mbr2gpt /convert /disk:0 /allowFullOS
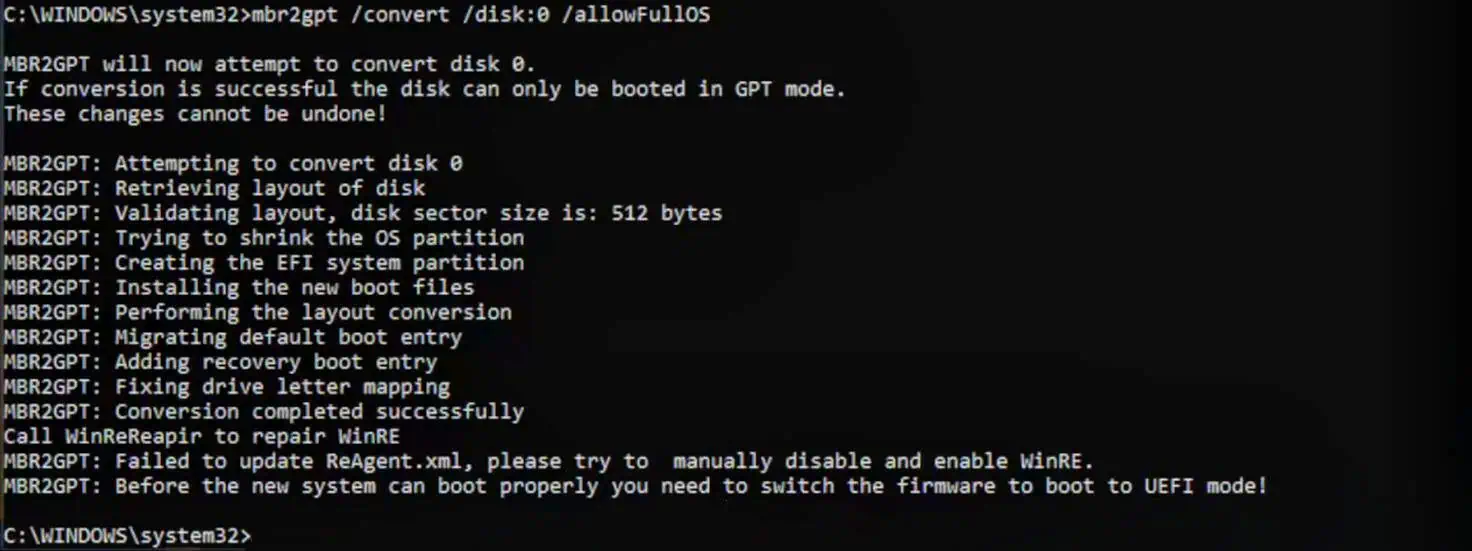
Die VM kann nun herunter gefahren werden. Falls der Hypermode aktiv ist, einfach statt Herunterfahren, einen Neustart durchführen und die VM in dem Moment stoppen, wenn das Proxmox-Boot-Logo angezeigt wird.
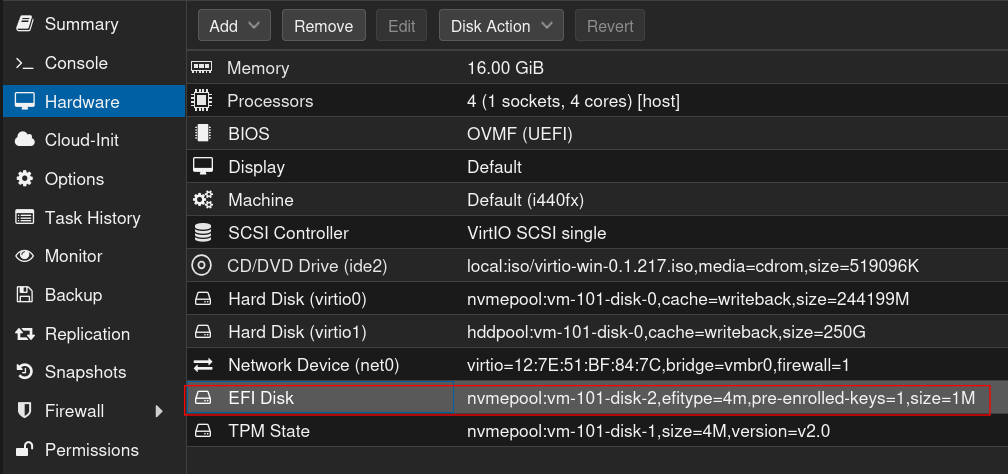
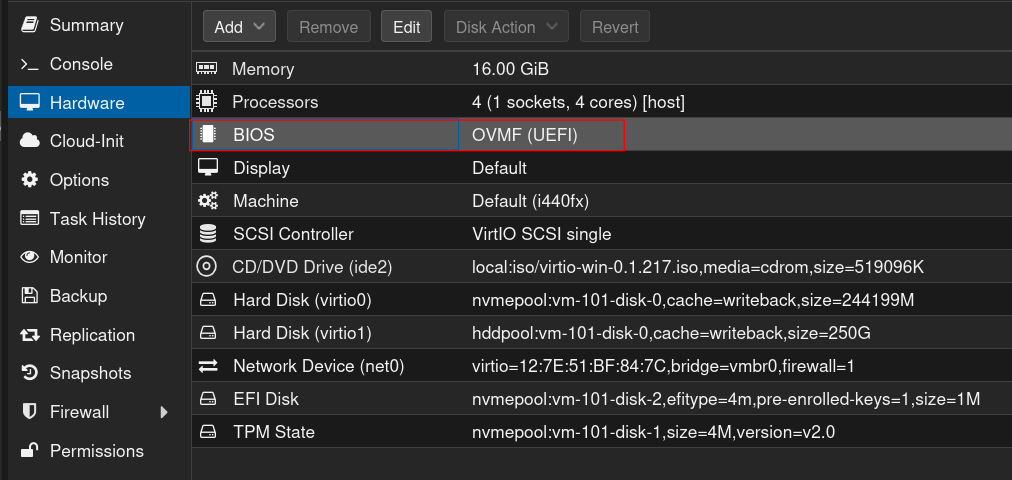
Teil 3: Anpassungen der VM Hardware unter Proxmox VE
1. Umstellung der CPU auf [host]
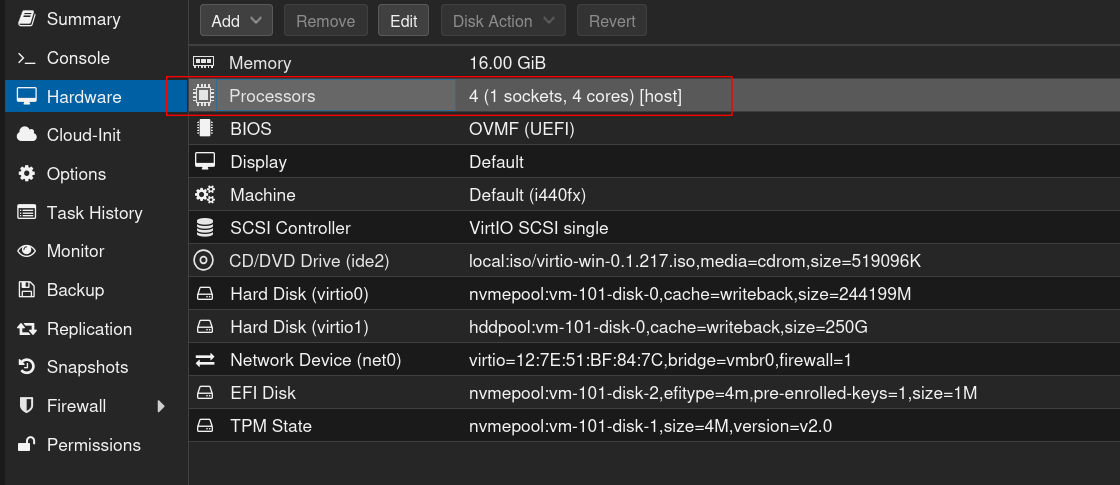
2. Einfügen einer EFI Partition
3. Umstellen des BIOS auf UEFI
4. Einfügen des TPM 2.0 Chips
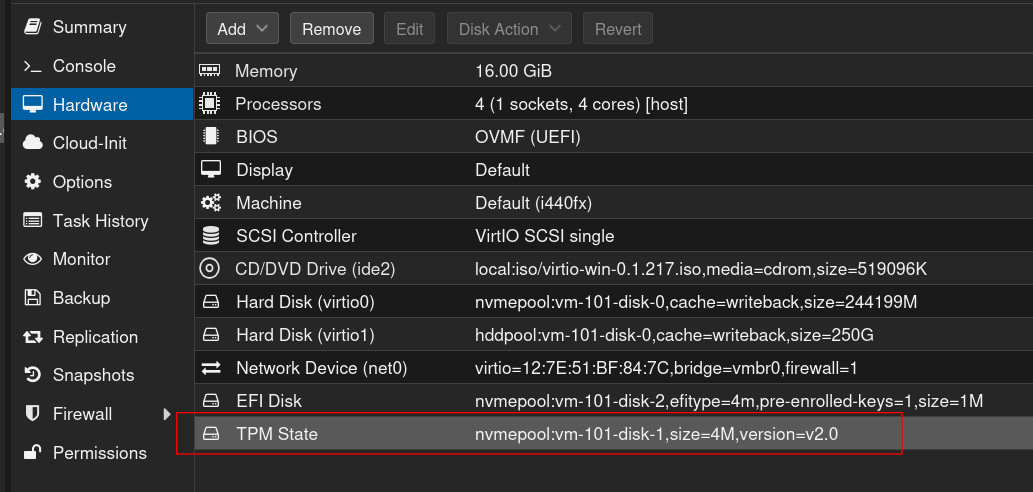
5. Booten der Windows 10 VM
Teil 4: Upgrade auf Windows 11

1. PC Health Check
Download PC Health Check unter https://aka.ms/GetPCHealthCheckApp, installieren und ausführen.
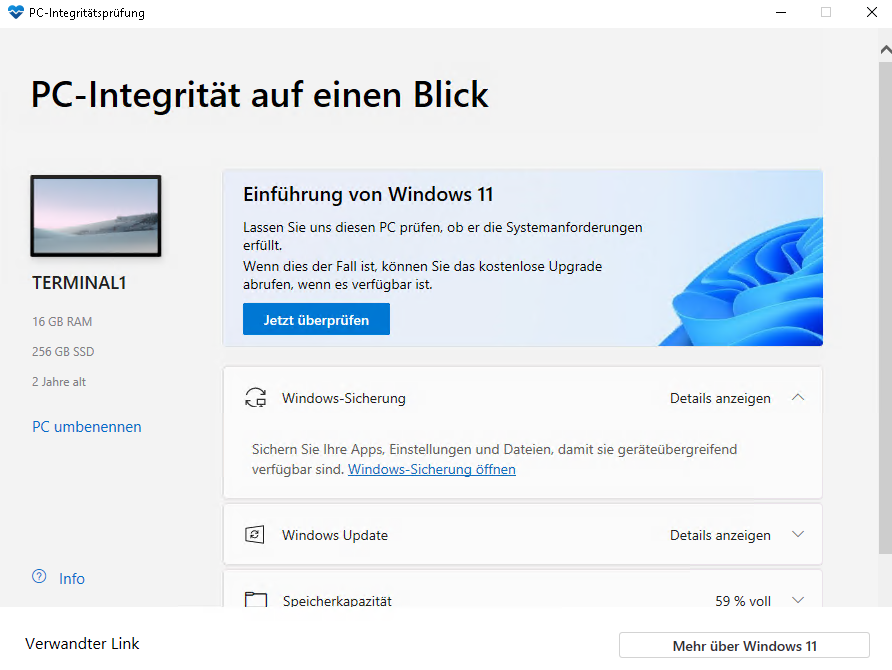
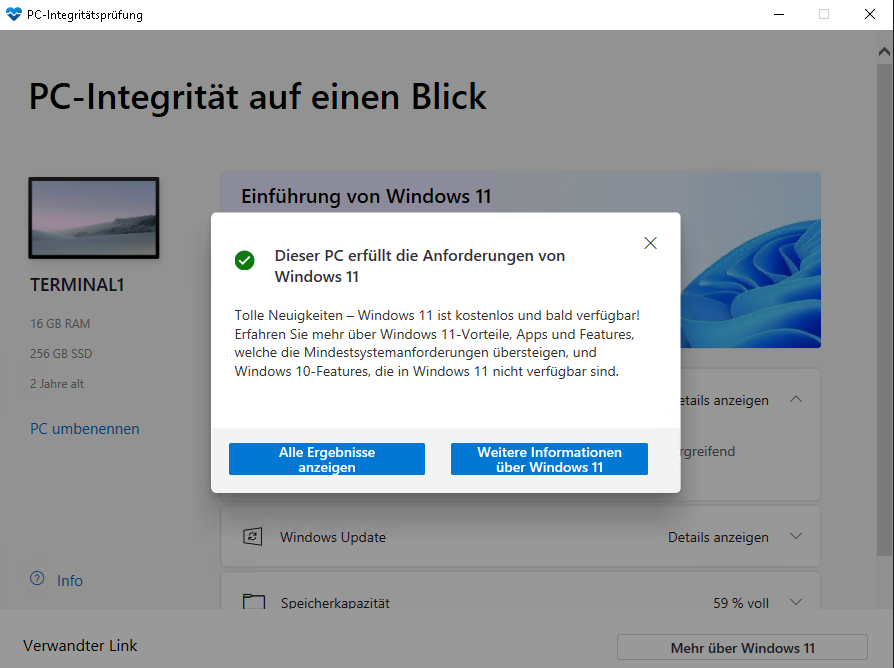

Wenn alles grün ist, kann das eigentliche Update beginnen.
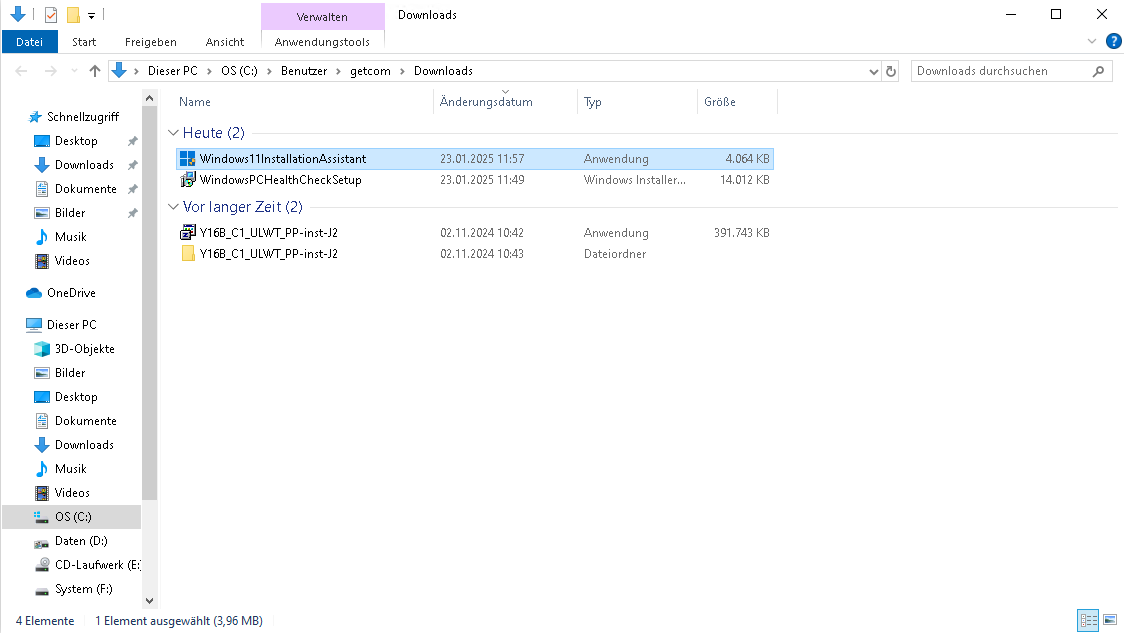
2. Update auf Windows 11
Falls Windows Update nicht anbietet, auf Windows 11 upzudaten, kann man das auch manuell anstoßen.
Download von Windows 11 Updater hier: https://www.microsoft.com/software-download/windows11
Ausführen der Setup-Datei Windows11InstallationAssistant:
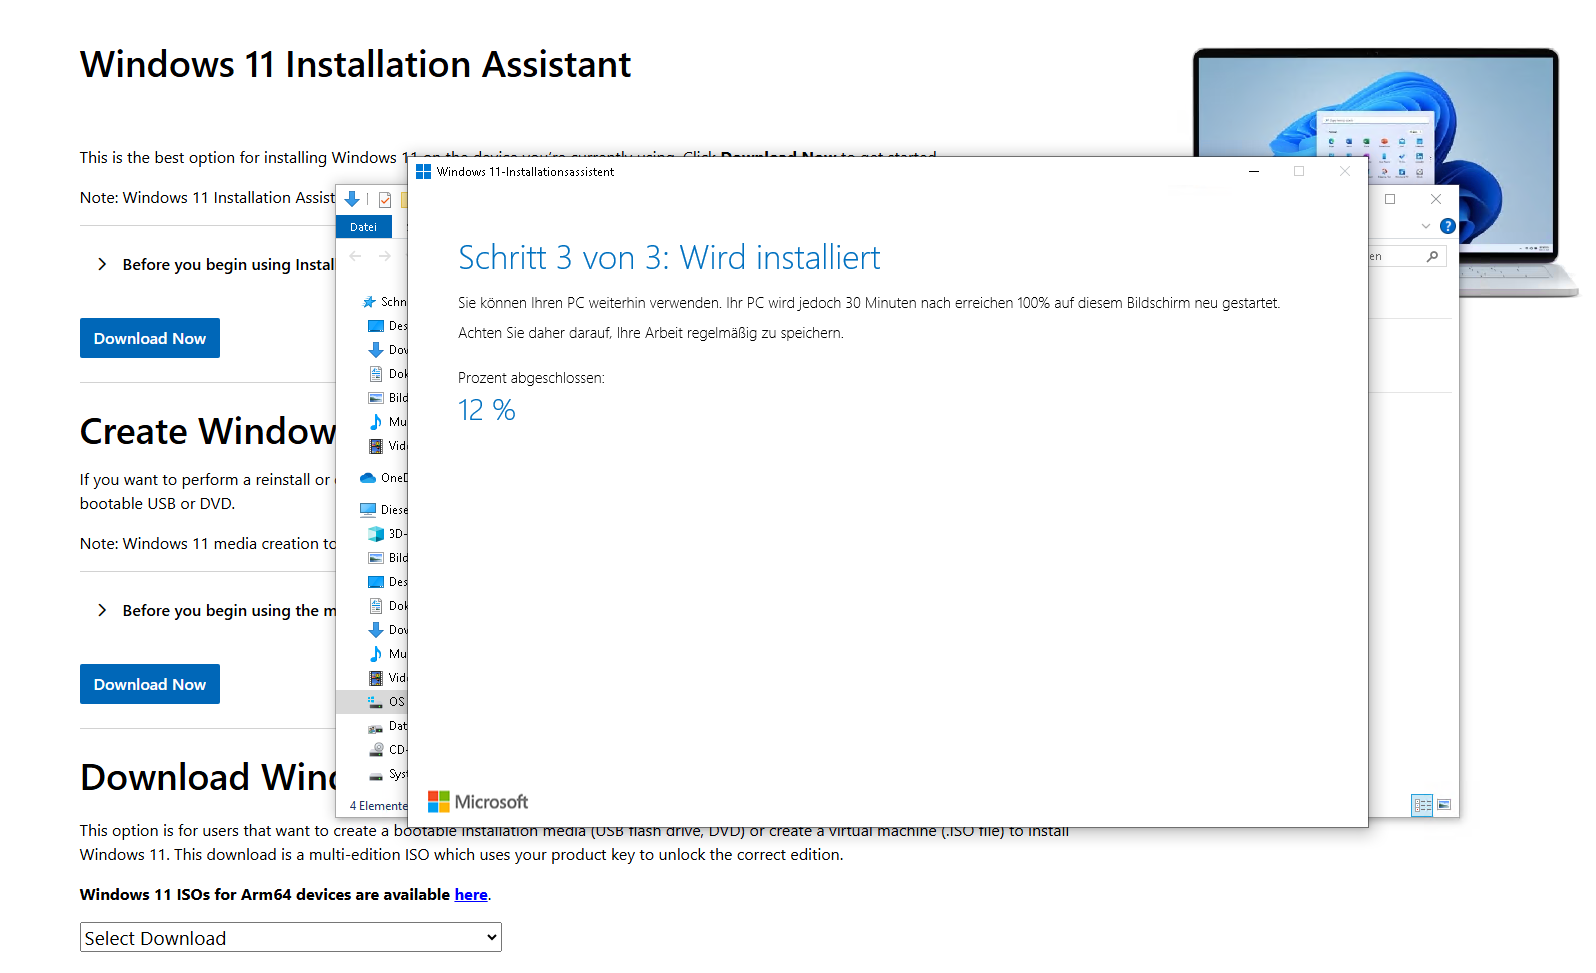
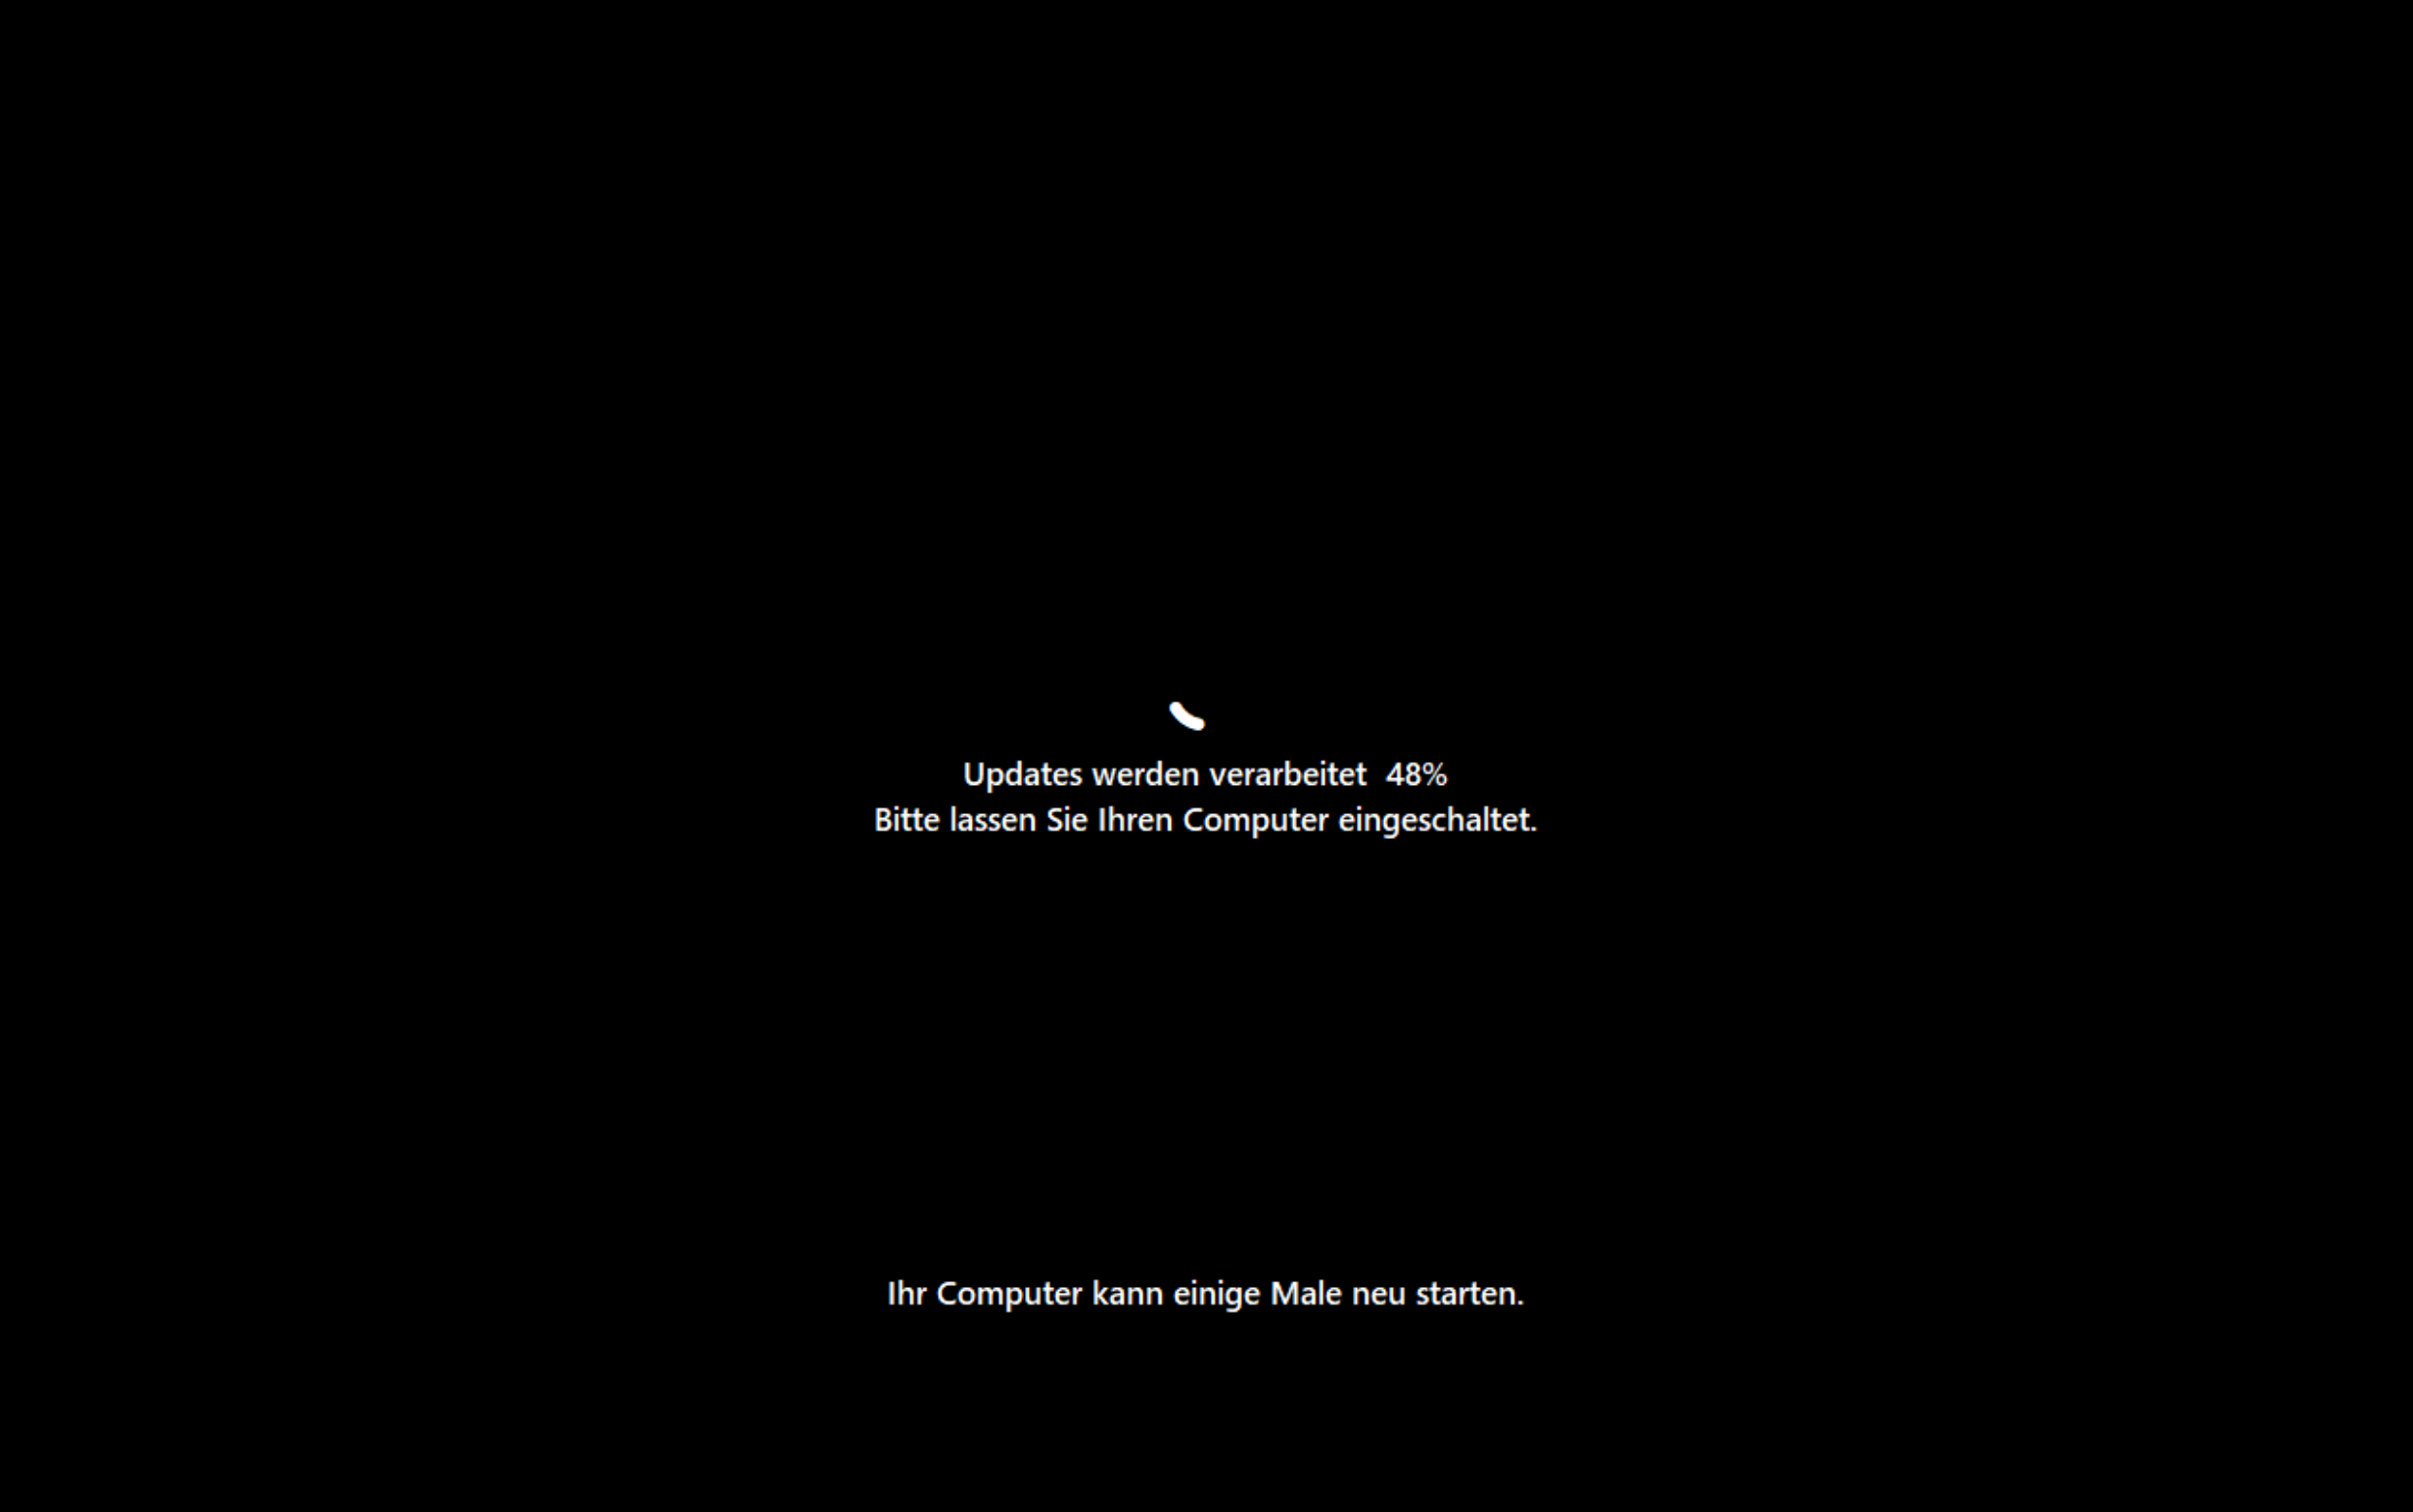
Nach dem Neustart steht Windows 11 zur Verfügung.
Voilà

von Ralf Schweiger | Jan. 21, 2025 | Allgemein, Linux, Proxmox, Virtualsierung
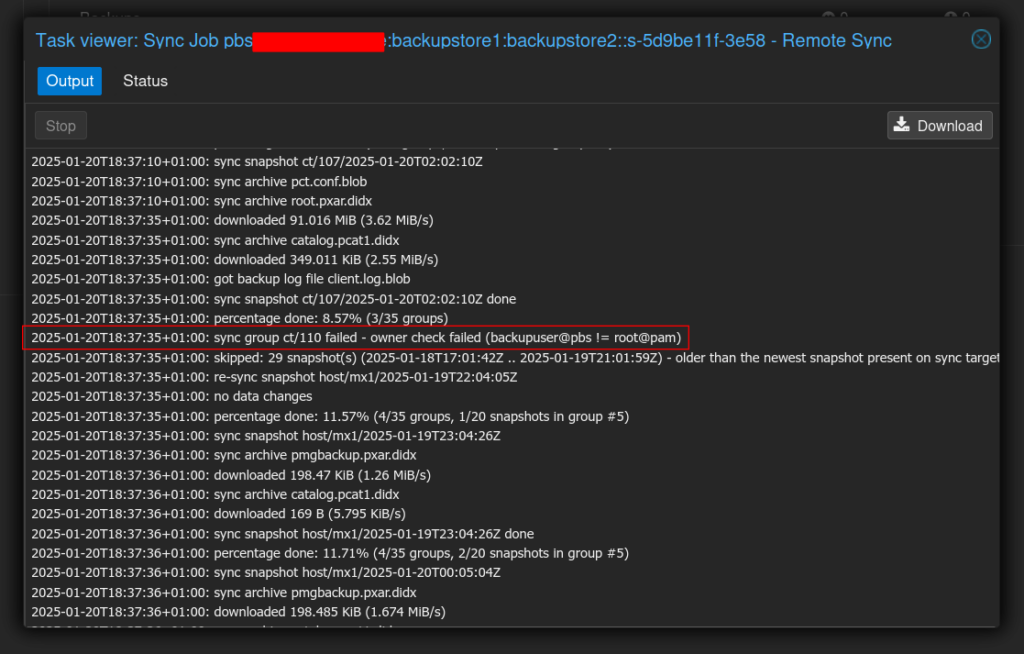
Nachfolgende Fehlermeldung führt dazu, dass die Backups für die Sync-Gruppe ct/110 auf einen Fehler laufen:
2025-01-20T18:37:35+01:00: sync group ct/110 failed - owner check failed (backupuser@pbs != root@pam)
Aus irgendeinem Grund stimmen die lokalen Berechtigungen nicht für die Sync-Gruppe.
Hier scheint sich das um einen Bug zu handeln, der bei Verbindungsabbrüchen von online Backups und VPN-Tunnel zum Tragen kommt.
Bei Proxmox haben einige User dieses Problem. Da gab es auch einen Bug dazu, der aber noch nicht nachgestellt werden konnte.
Ein Workaround, der bei uns funktionierte, ist einfach die ownership der Sync-Gruppe auf dem Sync-Server zu überschreiben:
Annahme: Das Backup-Repo soll backupstorage2 heißen, der lokale Benutzer mit entsprechenden Berechtigungen auf das Repo soll backupuser@pbs heißen, dann wäre der Befel folgender:
proxmox-backup-client change-owner ct/110 backupuser@pbs --repository backupstore2
Möchte man alle vorhandenen Sync-Gruppen in einem Rutsch bereinigen, kann das in das Script „/usr/local/bin/pbs-correct-sync-group-ownership.sh“ packen:
#!/bin/bash
storagepath="$(dirname $(grep path /etc/proxmox-backup/datastore.cfg | awk '{print $2}'))"
repository="$(grep datastore: /etc/proxmox-backup/datastore.cfg | awk '{print $2}')"
backupuser="$(grep -r owner /etc/proxmox-backup/sync.cfg | awk '{print $2}')"
type="ct host vm"

for t in $type
 {
 for s in $(ls $storagepath/$repository/$t)
  {
   printf "Changing ownership of sync group $t/$s...\n"
   proxmox-backup-client change-owner $t/$s $backupuser --repository $repository
  }
 }
von Ralf Schweiger | Sep. 9, 2019 | Allgemein, Infiniband
In all cases, read the manual and the release notes, especially if you plan to upgrade the firmware/software version. I will not be responsible if you damage your (expensive) equipment…

Use a serial connection
You can connect to the switch with the serial cable provided with the switch, and the screen command.
screen /dev/ttyUSB0 38400,vt100
Or SSH
If you connect the management interface to the network, you can also assign an IP to the switch via DHCP and use ssh:
ssh guest@a.b.c.d
You will find the default passwords in the manual.
Change all passwords
CORE2# password update admin
Enter new password (up to 8 characters) password: *******
Re-enter new password (up to 8 characters)password: *******
OK
CORE2# password update guest
Enter new password (up to 8 characters) password: *******
Re-enter new password (up to 8 characters)password: *******
OK
CORE2# password update root
Enter old password  (up to 8 characters)password: *******
Enter new password (up to 8 characters) password: *******
Re-enter new password (up to 8 characters)password: *******
OK
Time
The format of the time is MMDDhhmmyyyy (M = month, D = day, h = hour, m = second, y = year). Replace e.f.g.h with the IP of your preferred NTP server.
enable
config
ntp
clock set 031411502013
ntp server-ip-address set e.f.g.h
ntp status set enable
And finally, choose your timezone.
time-zone list show
> 170) Europe/Berlin

time-zone set 170
Name
You can set the hostname of the switch with the following commands. This name will be used in the “Node description” field, and is important if you want to understand the output of the IB commands (ibnetdiscover, ibswitches, etc).
enable
config
names
unique-default-name set disable
system-name set infinibandswitch14
exit
Subnet Manager
Choose the routing algorithm, in my case, min-hop. The other routing algorithms are documented here, choose accordingly to your network topology.
config
sm
sm-info show
-> default to min-hop
Or disable it if you have already installed a subnet manager:
sm-info mode set disable
At the end, restart the switch, it should be back in ~5 or ~10 minutes.
reload
Firmware/Software updates:
I have only tested the update from SW version 3.6.2-635 to 3.9.1-985. In all cases, you MUST read the release notes corresponding to your update. An error in the update process may break your switch.
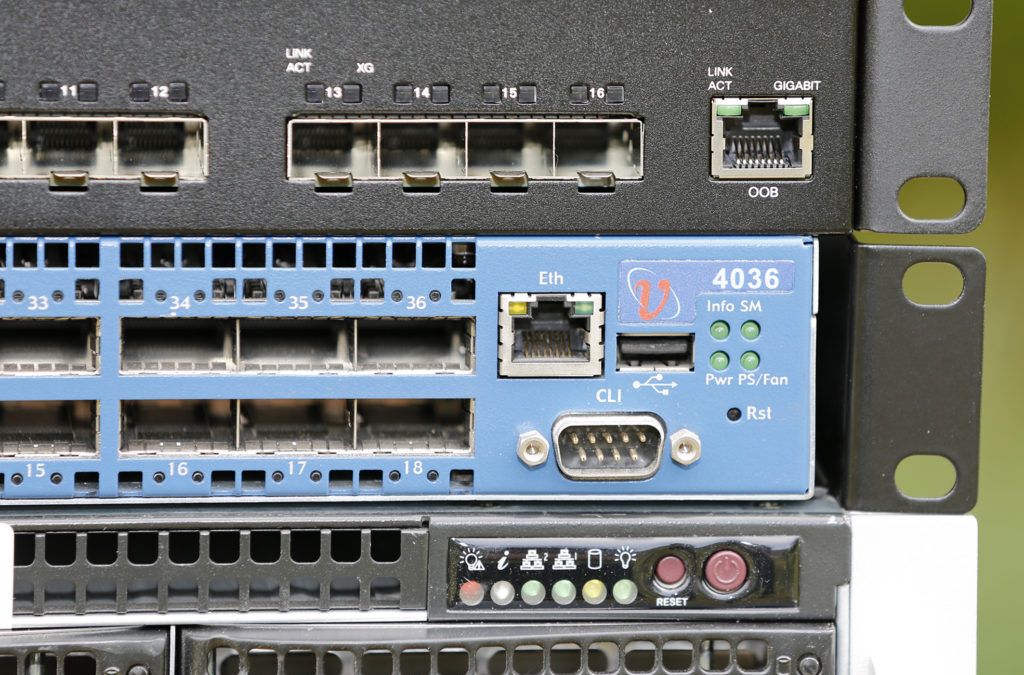
- Again, read the release notes on mellanox.com, for the Voltaire grid director 4036 (not 4036E).
- If you still want to run this update, download the file
upgrade_all.tgz.
- Create a special user account voltaire on a SSH server (
10.180.44.23) listening on port 22, with password authentication allowed.
- Configure the remote server which host your firmware/software files:
  config
  remote
  server 10.180.44.23
  protocol set SCP
  username gd4036-fwupd
  password

  SWITCH-IB5(config-remote)# remote show
  remote configuration
  -----------------------
  remote server: a.
  username:      gd4036-fwupd
  protocol:      SCP
- Read the current firmware & software version
  infinibandswitch14# module-firmware show

  Module No.      Type            Node GUID             LID   FW Version  SW Version
  ----------      ----            ---------             ---   ----------  ----------
  4036/2036                                                               3.6.2-365
  ---------
          CPLD    1                                             0xa
          IS4     1               0x0008f10500201238    1      7.4.2200      VLT1210032201
- push firmware_complete.tgz in
10.180.44.23:~voltaire/ and untar it (tar -xzf firmware_complete.tgz).
- on the IB switches, in a SCREEN:
update software chassis [directory]
- Wait
- After the upgrade, you should see the new versions installed
  infinibandswitch14# version show
          version: 3.9.1
          date:    Sep 23 2012 12:11:59 PM
          build Id:985
  SWITCH-IB5# module-firmware show

  Module No.      Type            Node GUID             LID   FW Version  SW Version
  ----------      ----            ---------             ---   ----------  ----------
  4036/2036                                                               3.9.1-985
  ---------
          CPLD    1                                             0xa
          IS4     1               0x0008f10500201238    1      7.4.2200      VLT1210032201
  ---------